



Examination
1. Drive belts can be V-belts or ribbed poly V-belts. These belts, sometimes called V-belts or simply fan belts, are located on the left side of the engine. Good condition and correct adjustment of the alternator belt are important for engine operation. Drive belts stretch and deteriorate over time. Therefore, they should be checked periodically.
2. The number of drive belts used on a particular vehicle depends on the accessories installed. One belt transmits rotation from the crankshaft to the alternator and water pump. The air conditioning compressor and power steering pumps are driven by their own belts.
3. With the engine off, open the hood and locate the drive belts on the left side of the engine. Using a flashlight, inspect each belt. On V-belts, check for cracks or peeling. On ribbed belts, check for peeling of the adhesive rubber on both sides of the base, peeling of the base from the belt, or breaks in the base. On ribbed belts, also check for separation of the ribs from the adhesive rubber, breaks or peeling of the ribs, wear of the ribs, or breaks in the inner edges of the ribs. On both types of belts, check for abrasion, which makes the belt shiny. Both sides of the belt should be checked, i.e. the belt should be turned over and the back side inspected. In places that cannot be visually inspected, feel the belt with your fingers. If any of the above signs are present, replace the belt (go to step 8).
4. To check the tension of each belt, press the belt midway between the pulleys. Press the belt with your thumb with a force of approximately 5 kg and measure the belt deflection. Compare the value obtained with the specification given in this chapter.
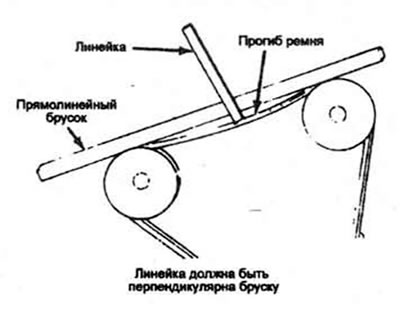
12.4 Measure the drive belt deflection using a straight edge and a ruler.
The article is based on data from the website [www.MitsubishiMan.ru]
Adjustment
5. The belt tension is adjusted by moving the auxiliary roller on the bracket.
6. To adjust the belt tension of some units, loosen the adjusting bolt that secures the unit to the slotted bracket and rotate the unit (from the cylinder block to tighten the belt, to the cylinder block to loosen the belt). When adjusting the belt tension, it is convenient to rotate the unit or the power steering pump with a large lever, which will allow you to more accurately position the alternator before tightening the adjusting bolt. Be careful not to damage the unit housing, especially the aluminum alternator housing. Recheck the belt tension in the manner described above.
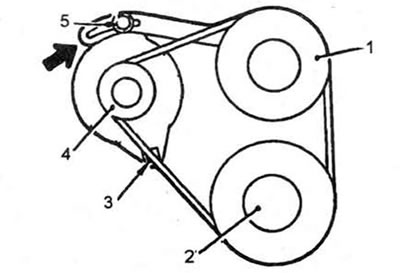
12.6. Adjust the tension of the generator drive belt by moving the generator.
7. On some devices, loosen the locking bolt to adjust the belt tension. Adjust the tension with the belt tension bolt and tighten the locking bolt.
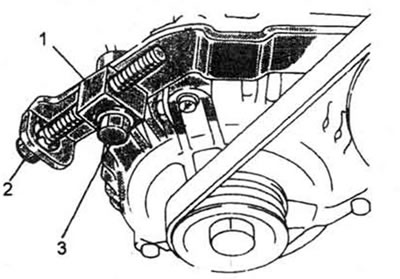
12.7. Loosen the lock bolt and turn the adjusting bolt to tighten or loosen the drive belt.
Replacement
8. To replace the belt, follow the same procedure as above for adjusting the belt tension, but remove the belt from the crankshaft pulley and remove it. Some belts will require other belts to be removed first, due to the location of the belts on the crankshaft pulley. For this reason, and because belts wear more or less equally, it is recommended that belts be replaced at the same time. Mark each belt and its corresponding pulley groove so that new belts can be installed in the correct position.
9. Take your old belts with you to the auto parts store to directly compare the length, width, and construction of the belt with the belt you are purchasing.
10. After replacing the ribbed drive belt, make sure that it fits correctly into the pulley grooves. It is necessary that the belt is correctly centered.
11. Adjust the belt tension according to the procedure described above.