
English Русский
Български
Беларускі
Український
Српски
Hrvatski
Română
Polski
Slovenský
Magyar
Articles Bookmark Contacts Sitemap   
Company Audi Company Ford Company Hyundai Company Kia Company Mazda Company Mercedes-Benz Company Nissan
MitsubishiMan.ru


Home Colt Lancer Galant L200 Outlander Pajero Others
Galant 6 and 7 (1987-1998) Galant 5 (1983-1989, petrol)

Valve Cover — Removal and Installation (Mitsubishi Galant 5)

  • Home
  • Galant
  • 5 (1983-1989, petrol)
  • Power unit
  • Engine repair
  • Valve Cover — Removal and Installation
0
1. Disconnect the cable from the negative battery terminal.

2. Remove the air filter (see Chapter 4).

3. Disconnect the high-voltage wires from the spark plugs and the wiring bracket from the valve cover.

Note: On DOHC engines, remove the center cover to access the spark plugs.


4. Clearly mark and disconnect any hoses and wires that are connected to or pass over the valve cover.

5. Unscrew the valve cover bolts and remove the cover. If the cover is stuck to the cylinder head, tap it with a soft hammer or a wooden block.
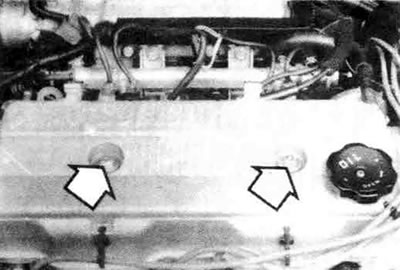


3.5a. Remove the valve cover bolts (arrows) - 2.0L engine shown
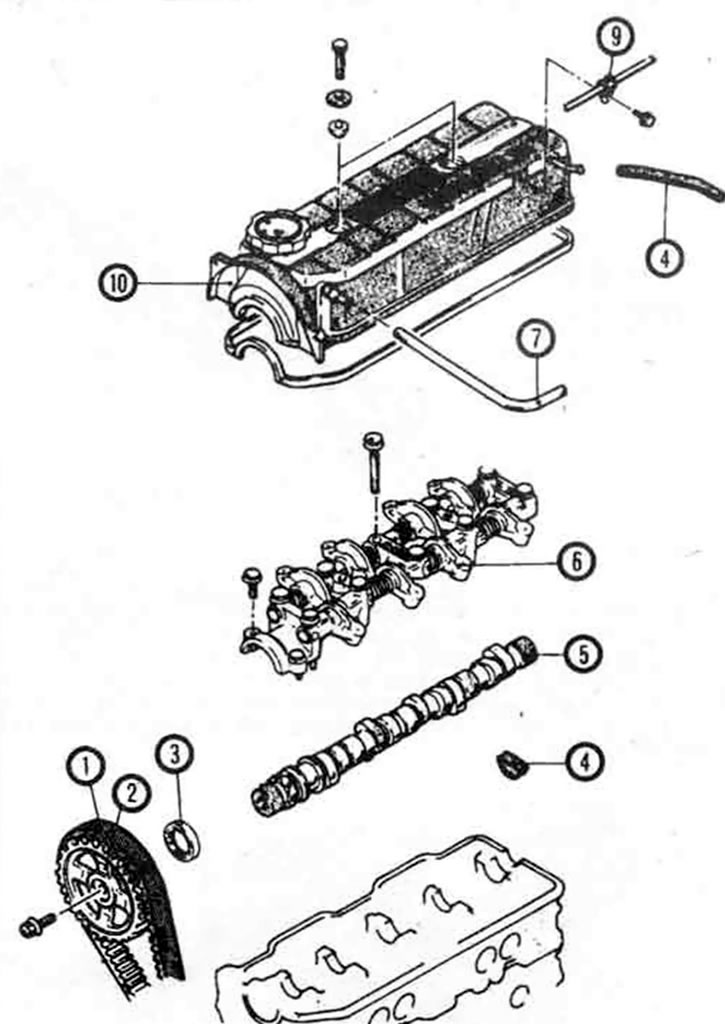


3.5b. Exploded view of the SOHC engine valve cover, valve rocker arms and camshaft. 1. Toothed belt; 2. Camshaft sprocket; 3. Camshaft seal; 4. Semi-circular seal; 5. Camshaft; 6. Valve rocker assembly; 7. PCV hose; 8. Ventilation hose; 9. Cable clamp; 10. Valve cover
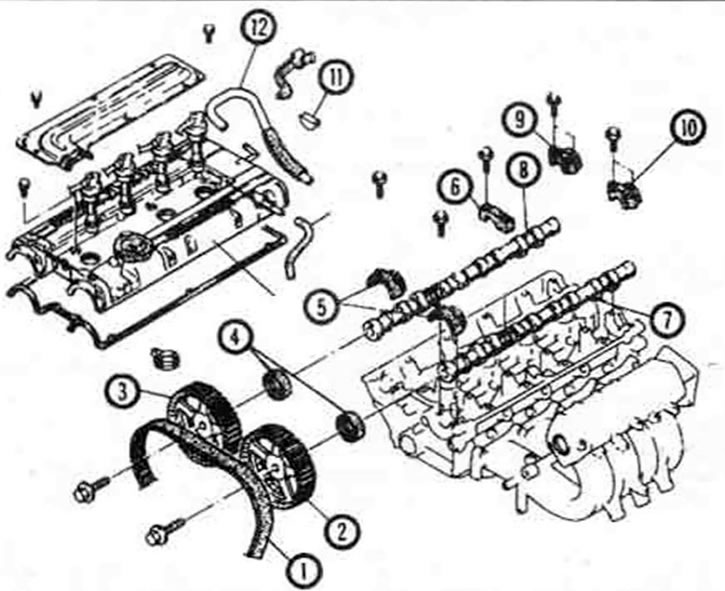


3.5s. Exploded view of the DOHC engine valve cover, valve rocker arms and camshafts.1. Toothed belt; 2. Camshaft sprocket (intake); 3. Camshaft sprocket (exhaust); 4. Camshaft seal; 5. Camshaft bearing caps; 6. Camshaft bearing cap; 7. Camshaft (intake); 8. Camshaft (exhaust); 9. Camshaft bearing cap; 10. Camshaft bearing cap; 11. Semicircular seal; 12. Ventilation hose.


6. Clean the valve cover completely and remove all traces of the old gasket.

7. Install a new gasket onto the cover, securing it in place with sealant. Place the cover on the engine and insert the bolts.

Note: Install a new semi-circular seal into the cylinder head. Apply a small amount of sealant to the lower surface of the seal, and after installing the seal, apply a small amount of sealant to its upper surface.


8. Tighten the bolts to the torque specified in the specifications in this chapter. The rest of the procedure is carried out in the reverse order of disassembly. When finished, start the engine and check for leaks.
This article is available at: russian, bulgarian, belarusian, ukrainian, serbian, croatian, romanian, polish, slovak, hungarian
This article was reviewed by: Vladimir Glazunov
Share with friends:
◀ Previous
Galant 5: Engine repair
Next ▶

Repair procedures that can be performed without removing the engine from the vehicle
General information and engine identification
Engine — Specifications
Valve Rocker Arms — Removal, Inspection and Installation
Valve springs, holders and valve stem seals — replacement
Hydraulic valve regulators — removal, inspection and installation
Toothed belt and sprockets
Front Crankshaft Seal — Replacement
Similar materials for other Mitsubishi models

➤ Valve cover — removal and installation Mitsubishi Colt 2 and 3 (1983-1993)
➤ Checking the tire valve Mitsubishi Lancer 3 and 5 (1984-1992)
➤ Removal and installation the valve cover Mitsubishi L200 4 (2005-2014, diesel)
➤ Checking the opening pressure of the radiator cap valve Mitsubishi Outlander 1 (2003-2008)
➤ Crankcase ventilation valve (petrol engines) Mitsubishi Pajero 1 and 2 (1982-1999)
➤ Checking and adjusting valve clearances (SOHC) Mitsubishi Carisma (1995-2004)
Link in different formats to this article
Comments and feedback from visitors
No comments yet


Add up two numbers 43 + 16


Galant 6 and 7 (1987-1998) 
  • General information
  • Introduction to guide
  • User manual
  • Driving and operation
  • Maintenance
  • Power unit
  • Dismantling the engine
  • Engine overhaul
  • Cooling and heating
  • Power and exhaust systems
  • Engine electrical equipment
  • Engine management systems
  • Transmission
  • Mechanical gearbox
  • Automatic gearbox
  • Clutch
  • Drive shafts and transfer case
  • Chassis and running gear
  • Brake system
  • Car suspension
  • Steering
  • Body and interior
  • Exterior (external elements)
  • Interior (internal elements)
  • Doors, locks and windows
  • Electrical equipment
  • Equipment and devices
  • Wiring diagrams Galant
  • Wiring diagrams Mirage
  • Wiring diagrams Diamante
Galant 5 (1983-1989, petrol) 
  • General information
  • Troubleshooting
  • Maintenance
  • Power unit
  • Engine repair
  • Engine overhaul
  • Cooling and heating
  • Fuel and exhaust system
  • Engine electrical equipment
  • Reducing exhaust toxicity
  • Transmission
  • Manual gearbox
  • Automatic gearbox
  • Clutch and drive shafts
  • Chassis and running gear
  • Brake system
  • Car suspension
  • Steering
  • Body and interior
  • Exterior (external elements)
  • Interior (internal elements)
  • Doors, locks and windows
  • Electrical equipment
  • Equipment and devices
  • Electrical diagrams
MitsubishiMan.ru © 2018–2026 • Mobile version • Articles about Mitsubishi • Contacts • Sitemap: EN BG BY UA RS HR RO PL SK HU • Site search • Bookmark
Colt 2 and 3 (1983-1993) · Colt 4 and 5 (1991-2003) · Colt 5 (1995-2003) · Lancer 3 and 5 (1984-1992) · Lancer 9 (2000-2007) · Galant 5 (1983-1989) · Galant 6 and 7 (1987-1998) · L200 4 (2005-2014) · Outlander 1 (2003-2008) · Pajero 1 and 2 (1982-1999) · Pajero 4 (2006-2021) · Carisma (1995-2004) · Space Star (1998-2005) ·
This resource sets cookies 🍪 to avoid bothering you with repeated data entry.