
English Русский
Български
Беларускі
Український
Српски
Hrvatski
Română
Polski
Slovenský
Magyar
Articles Bookmark Contacts Sitemap   
Company Audi Company Ford Company Hyundai Company Kia Company Mazda Company Mercedes-Benz Company Nissan
MitsubishiMan.ru


Home Colt Lancer Galant L200 Outlander Pajero Others
Galant 6 and 7 (1987-1998) Galant 5 (1983-1989, petrol)

Main and connecting rod bearings — inspection (Mitsubishi Galant 5)

  • Home
  • Galant
  • 5 (1983-1989, petrol)
  • Power unit
  • Engine overhaul
  • Main and connecting rod bearings — inspection
0
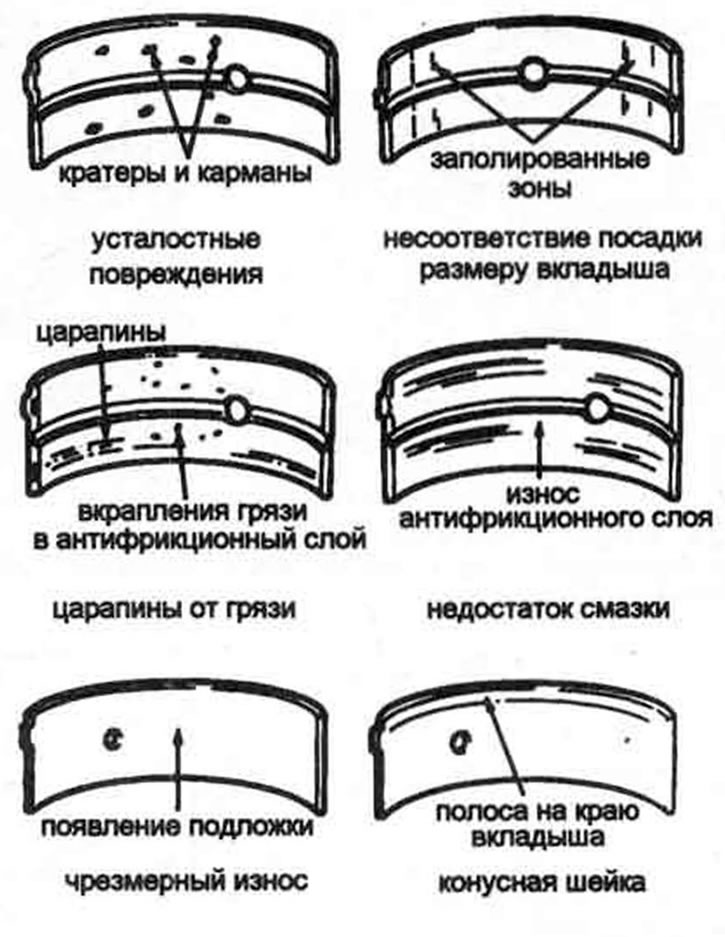
1. Even if the main and connecting rod bearings are replaced with new ones during engine overhaul, the condition of the old bearings must be carefully checked, since they contain important information about the condition of the engine (see illustration).


20.1. Typical bearing failures


2. Bearing failure occurs due to insufficient lubrication, dirt and other foreign particles, engine overload and corrosion. Regardless of the cause of bearing failure, it must be corrected before engine assembly to prevent recurrence.

3. When inspecting the bearings, remove them from the cylinder block, main bearing caps, connecting rods and connecting rod caps and lay them out on a clean surface according to their position in the engine. This will allow you to associate the condition of the bearings with the corresponding crankshaft journals.

4. Dirt and other foreign particles enter the engine in a variety of ways. They may be left in the engine during assembly or enter through filters or the PCV system. They may enter the oil and from there into the bearings. Often there are chips from machining and normal wear in the engine. Abrasive particles are sometimes left in the engine after rebuilds, especially when parts are not cleaned properly. Whatever the source, these foreign particles often become embedded in the soft bearing material and are not recognized. Large particles do not become embedded in the bearings and will scratch the bearing material and journals. The best way to prevent this cause of bearing failure is to maintain cleanliness during engine assembly. Frequent and regular engine oil changes are also recommended.


5. Insufficient lubrication (or poor lubrication system) has several interrelated causes. Overheating (causing the oil to become thinner), overloading (causing oil to be squeezed out of the bearing surfaces), and oil leakage or overflow (due to large bearing clearances, worn oil pumps, or high engine speeds) all contribute to poor lubrication system performance. Obstruction of oil passages, which is usually the result of misalignment of the oil holes in the bearing shells, leads to insufficient lubrication of the bearings and their failure. When insufficient lubrication leads to bearing failure, the bearing steel backing material is abraded or worn away. The temperature may rise to the point that the steel backing turns blue from overheating.

6. Driving style can also affect bearing life. Driving with the throttle fully open, driving at low speeds (overloading the engine) lead to very high loads on the bearings, which causes a decrease in the thickness of the oil film. Such loads cause the bearings to bend, which leads to the formation of small cracks on the bearing surfaces (fatigue damage). Over time, the bearing material wears away and exposes the steel base. Short trips cause corrosion of bearings, since the engine does not warm up sufficiently to remove condensed water and corrosive gases. These products accumulate in the engine oil, forming acid and sticky deposits. When such oil enters the bearings, the acid causes corrosion of the material.

7. Incorrect installation of bearings during engine assembly also leads to bearing failure. Too tight tightening of bearings leads to a decrease in the lubrication gap and to stagnation of oil. Dirt or foreign particles accumulated behind the bearing shell lead to the formation of stains on the bearing and its failure.
This article is available at: russian, bulgarian, belarusian, ukrainian, serbian, croatian, romanian, polish, slovak, hungarian
This article was reviewed by: Vladimir Glazunov
Share with friends:
◀ Previous
Galant 5: Engine overhaul
Next ▶

Crankshaft — check
Pistons/Connecting Rods — Check
Cylinder honing
Cylinder Block — Check
Cylinder Block — Cleaning
Engine overhaul — assembly sequence
Piston rings — installation
Crankshaft — installation and checking of main bearing clearance
Install the rear crankshaft seal
Pistons/Connecting Rods — Installing and Checking Connecting Rod Bearing Clearance
Similar materials for other Mitsubishi models

➤ Main and connecting rod bearings — inspection Mitsubishi Colt 4 and 5 (1991-2003)
➤ Wheel hub bearings — device Mitsubishi Lancer 3 and 5 (1984-1992)
➤ Checking the front and rear wheel hub bearings Mitsubishi L200 4 (2005-2014, diesel)
➤ Socket for connecting additional electrical appliances Mitsubishi Outlander 1 (2003-2008)
➤ Replacing connecting rod bearings Mitsubishi Pajero 1 and 2 (1982-1999)
➤ Repair of the main brake cylinder Mitsubishi Carisma (1995-2004)
Link in different formats to this article
Comments and feedback from visitors
No comments yet


Add up two numbers 12 + 25


Galant 6 and 7 (1987-1998) 
  • General information
  • Introduction to guide
  • User manual
  • Driving and operation
  • Maintenance
  • Power unit
  • Dismantling the engine
  • Engine overhaul
  • Cooling and heating
  • Power and exhaust systems
  • Engine electrical equipment
  • Engine management systems
  • Transmission
  • Mechanical gearbox
  • Automatic gearbox
  • Clutch
  • Drive shafts and transfer case
  • Chassis and running gear
  • Brake system
  • Car suspension
  • Steering
  • Body and interior
  • Exterior (external elements)
  • Interior (internal elements)
  • Doors, locks and windows
  • Electrical equipment
  • Equipment and devices
  • Wiring diagrams Galant
  • Wiring diagrams Mirage
  • Wiring diagrams Diamante
Galant 5 (1983-1989, petrol) 
  • General information
  • Troubleshooting
  • Maintenance
  • Power unit
  • Engine repair
  • Engine overhaul
  • Cooling and heating
  • Fuel and exhaust system
  • Engine electrical equipment
  • Reducing exhaust toxicity
  • Transmission
  • Manual gearbox
  • Automatic gearbox
  • Clutch and drive shafts
  • Chassis and running gear
  • Brake system
  • Car suspension
  • Steering
  • Body and interior
  • Exterior (external elements)
  • Interior (internal elements)
  • Doors, locks and windows
  • Electrical equipment
  • Equipment and devices
  • Electrical diagrams
MitsubishiMan.ru © 2018–2026 • Mobile version • Articles about Mitsubishi • Contacts • Sitemap: EN BG BY UA RS HR RO PL SK HU • Site search • Bookmark
Colt 2 and 3 (1983-1993) · Colt 4 and 5 (1991-2003) · Colt 5 (1995-2003) · Lancer 3 and 5 (1984-1992) · Lancer 9 (2000-2007) · Galant 5 (1983-1989) · Galant 6 and 7 (1987-1998) · L200 4 (2005-2014) · Outlander 1 (2003-2008) · Pajero 1 and 2 (1982-1999) · Pajero 4 (2006-2021) · Carisma (1995-2004) · Space Star (1998-2005) ·
This resource sets cookies 🍪 to avoid bothering you with repeated data entry.