



Contents: Disassembly ⤓ Examination ⤓
The piston pins are secured on both sides with retaining rings. If it is necessary to replace parts, remove only the pistons from the connecting rods.
Disassembly
1. The pistons can be removed after removing the retaining rings. Place the piston in hot water and knock out the pin, placing the piston on a reliable gasket, with a suitable rod. Remove the rings one by one.
2. When using other tool, do not break the rings.
Examination
1. Clean and check all parts thoroughly. If damage or wear of parts is detected, they should be replaced.
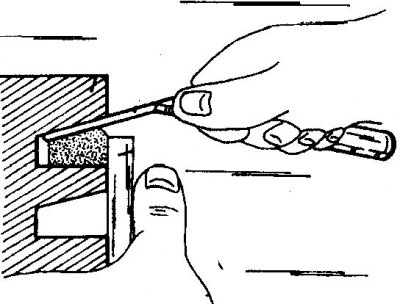
2. Measure the clearances in the piston grooves. To check the clearance, it is necessary that the rings fit tightly in the grooves. To check, using the diagram, place a flat bar on the piston to press the rings into the grooves, then insert feeler gauges at an angle to measure the gap. Before taking measurements, the grooves should be thoroughly cleaned.
If the piston ring height clearances are outside the tolerance limits, replace the piston rings. In the worst case, the pistons have to be replaced. There are piston rings and pistons of increased dimensions.
3. Measure the joint clearances of individual piston rings in the cylinder bores.
To do this, insert the rings into the holes one by one and push them into the hole with an inverted piston until they are positioned at the bottom of the hole. Measure the joint gap by inserting feeler gauges from the bottom of the engine crankcase.
4. If the results differ from the values given in the adjustment and dimension tables, the piston rings should be replaced.
5. Check the wear of the piston pins and their holes. The piston pin should move in the hole in the piston with tension when moving it with a finger after good lubrication. The pin should also move in the bushing hole on a diesel engine. In this case, the piston and pin must be at room temperature. In the connecting rod, the pin sits on a tight fit, which therefore cannot be checked.
6. On the bottom of the piston there is an arrow pointing in the direction of the vehicle's movement. Maintaining the installation position is very important, since the piston pin is inserted into the piston with an offset. On oversized pistons, the piston size is indicated on its bottom (e.g. "25", "50", etc.). Letters and numbers on the piston bottom indicate the engine type. The piston is marked with the letters "TS".
7. Check the connecting rods for visible damage. Damaged connecting rods must be replaced. Before reinstallation, check the connecting rods on a bench for warpage or bending, especially when removing the pistons. Be sure to replace any warped or bent connecting rods.