
English Русский
Български
Беларускі
Український
Српски
Hrvatski
Română
Polski
Slovenský
Magyar
Articles Bookmark Contacts Sitemap   
Company Audi Company Ford Company Hyundai Company Kia Company Mazda Company Mercedes-Benz Company Nissan
MitsubishiMan.ru


Home Colt Lancer Galant L200 Outlander Pajero Others
Pajero 4 (2006-2021) Pajero 1 and 2 (1982-1999)

Timing Belt and Engine Covers — Removal and Installation (Mitsubishi Pajero 1)

  • Home
  • Pajero
  • 1 (1982-1999)
  • Power unit
  • Diesel engines
  • Timing Belt and Engine Covers — Removal and Installation
0
Contents: Diesel toothed belt ⤓ Removal ⤓ Installation ⤓

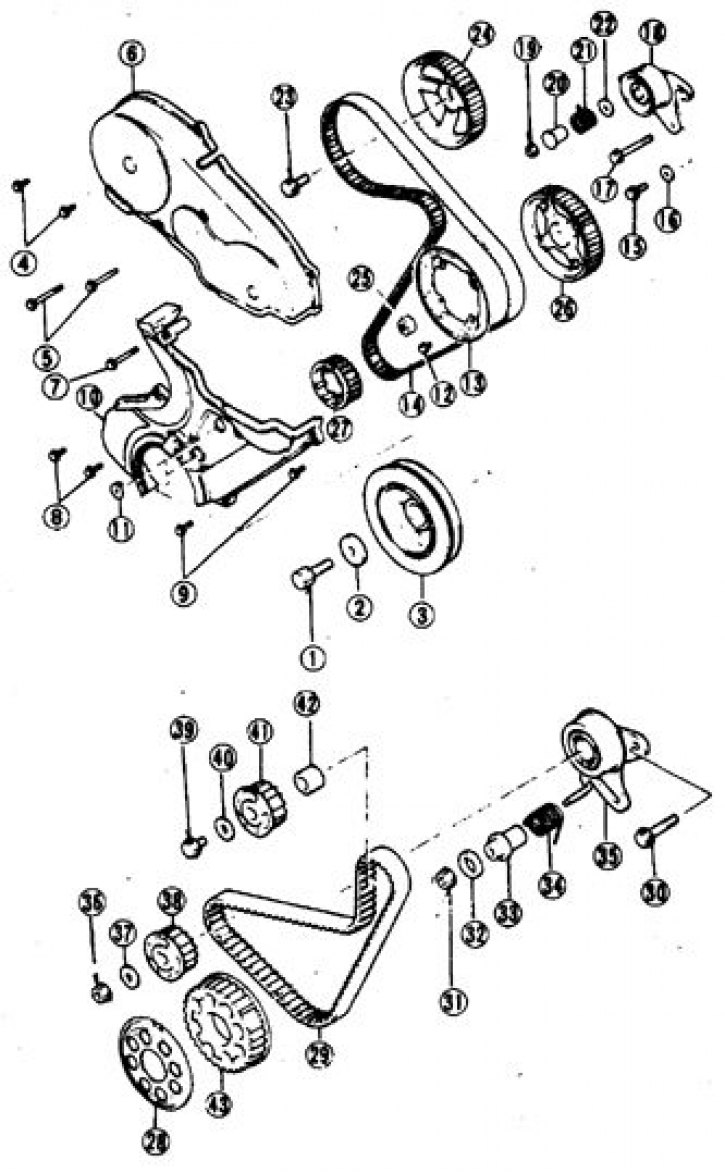
Diesel toothed belt


1, 4, 5, 7, 8, 9,12, 13, 15, 17, 23, 30, 39. Bolts; 2. Washer; 3. Calmator; 6. Top cover; 10. Bottom cover; 11. Plug; 14. Belt; 16. Washer; 18. Tensioner; 19, 25, 31, 36. Nut; 20, 33, 42. Bushing; 21. Spring; 22, 37, 40. Washer; 24. Camshaft sprocket; 26. Fuel pump sprocket; 27. Crankshaft sprocket; 28. Flange; 29. Belt B; 32. Spring; 34. Spring; 35. Belt tensioner B; 38, 41. Balance shaft sprocket; 43. Crankshaft sprocket B


Removal


Diesel timing belt alignment marks
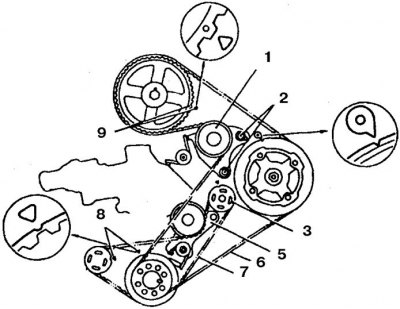


1. Tensioner; 2. Bolt; 3, 7. Vibration damper roller sprocket; 4. Tensioner B; 5. Belt; 6. Belt B; 8, 9. Tags


1. Disconnect the battery from ground.


2. Remove the drive belts, unscrew the bolts and remove the coolant pump and crankshaft pulleys.

3. Remove the top cover, paying attention to the location of the bolts.

4. Set the piston of the 1st cylinder to TDC of the compression stroke. From this point on, rotation of the crankshaft is not allowed.

5. Remove the crankshaft pulley.

6. Remove the lower belt cover.

7. Loosen the tensioner, move it towards the cooling pump, tighten the bolts.

8. Remove the camshaft and fuel pump sprockets, preventing the shafts of these units from rotating.

9. Remove the timing belt.

10. If the vibration damper belt is removed, secure the rollers by removing the plug on the right side and inserting a rod (8mm diameter screwdriver). On the left side, remove the cover and insert a thick rod (wrench extension).

11. Mark and remove the roller sprockets.

12. Check the condition of the belts; replace them if any defects are found.

Installation


1. Install the vibration damper shaft sprocket on the crankshaft, put on the pulley and tighten the bolt to a torque of 70 Nm.
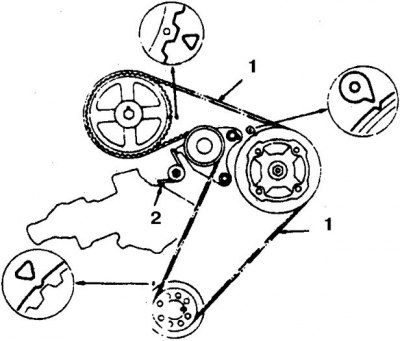


2. Install the fuel pump sprocket, bushings (cone inward) and roller sprockets. Tighten the sprocket bolts to 38 Nm (1 - tension side; 2 – cooling pump).


The original was published on the website: MitsubishiMan.ru
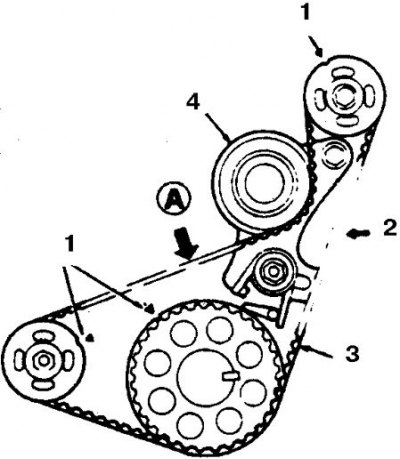


3. Align the marks on the roller sprockets (1 – marks; 2 – tension side; 3 – belt B; 4 – tensioner B). Check the tension of the roller belt at location A.

4. Fit the belt (B) so that there is slack on the side where the tensioner rests.

5. Check the alignment of the marks by pressing on the belt with your finger. Without releasing the tension, loosen the tensioner bolt and nut. Tighten the nut first, then the bolt.

6. Check the tension of the roller belt (deflection 5–7 mm).

7. Check the alignment of the sprocket marks on the camshaft and pump belts and put the belt on, stretching it between the crankshaft and the pump (during installation, an assistant holds the pump sprocket).
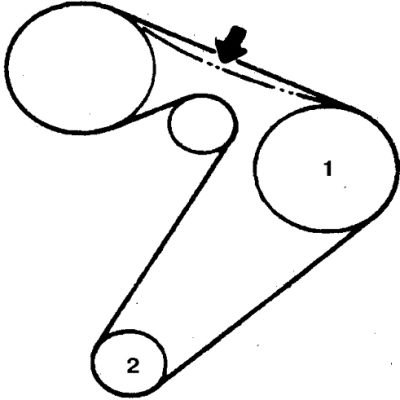


8. Loosen the tensioner bolts and take up the slack in the belt. Tighten the bolt in the tensioner groove, then the axle bolt. Check the fit of the belt to the camshaft sprocket (2), the belt may be loose in the 10 o'clock sector. Make sure that the belt does not touch the adjacent parts (1 - pump sprocket).


9. Check the alignment of the sprocket marks, remove the belts and align the sprockets if necessary.
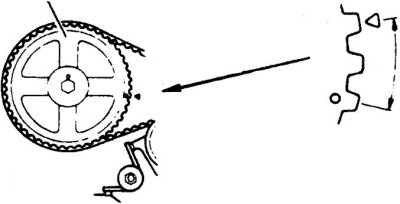


10. Turn the crankshaft so that the camshaft sprocket moves 2 teeth from the timing mark and return it back, setting the sprocket to its previous position.

11. Check the belt tension (the deflection should be no more than 4–5 mm).

12. Install the covers and other removed parts. Tighten the crankshaft pulley bolt to 64–73 N·m.
This article is available at: russian, bulgarian, belarusian, ukrainian, serbian, croatian, romanian, polish, slovak, hungarian
This article was reviewed by: Arseny Pavlov
Share with friends:
◀ Previous
Pajero 1 and 2: Diesel engines
Next ▶

Cylinder head — removal and installation
Turbocharger — General Information
Combined manifold (turbo diesel)
Rollers and rocker arms of diesel engines — removal and installation
Cylinder Head Cover — Removal and Installation
Oil pump and silent rollers (vibration dampers)
Camshafts and bearings — removal and installation
Removal and installation of a diesel engine
Disassembling a diesel engine
Pistons and connecting rods — disassembly and inspection
Similar materials for other Mitsubishi models

➤ Timing Belt — Tension Adjustment (SOHC 16 Valve) Mitsubishi Colt 4 and 5 (1991-2003)
➤ Adjusting the tension of the timing belt of a gasoline… Mitsubishi Lancer 3 and 5 (1984-1992)
➤ Removal and installation the timing belt cover and timing… Mitsubishi Galant 6 and 7 (1987-1998)
➤ Removal the timing belt Mitsubishi L200 4 (2005-2014, diesel)
➤ Replacing the timing belt and balancer drive belt (4G64,… Mitsubishi Outlander 1 (2003-2008)
➤ Adjusting the Timing Belt Tension of a SOHC Engine Mitsubishi Carisma (1995-2004)
Link in different formats to this article
Comments and feedback from visitors
No comments yet


Add up two numbers 21 + 26


Pajero 4 (2006-2021) 
  • General information
  • User manual
  • Troubleshooting
  • Maintenance
  • Technical specifications
  • Power unit
  • Engine repair
  • Cooling system
  • Lubrication system
  • Fuel system
  • Engine management system
  • Intake and exhaust system
  • Engine electrical equipment
  • Transmission
  • Clutch
  • Manual gearbox
  • Automatic gearbox
  • Drive shafts
  • Chassis and running gear
  • Front suspension
  • Rear suspension
  • Brake system
  • Steering
  • Body and interior
  • Exterior (external elements)
  • Interior (internal elements)
  • Doors, locks and windows
  • Body dimensions
  • Electrical equipment
  • Safety system (SRS)
  • Air conditioner
  • Equipment and devices
  • Electrical diagrams
Pajero 1 and 2 (1982-1999) 
  • General information
  • User manual
  • Seats and seat belts
  • Instruments and controls
  • Driving and operation
  • Maintenance
  • Power unit
  • Gasoline engines
  • Diesel engines
  • Ignition system
  • Engine electrical equipment
  • Cooling and lubrication system
  • Power and exhaust system
  • Fuel system (gasoline)
  • Fuel system (diesel)
  • Transmission
  • Clutch
  • Mechanical gearbox
  • Automatic gearbox
  • Drive shafts and axles
  • Chassis and running gear
  • Front suspension
  • Rear suspension
  • Steering
  • Brake system
  • Body and interior
  • Exterior (external elements)
  • Interior (internal elements)
  • Doors, locks and windows
  • Electrical equipment
  • Equipment and devices
  • Heater and air conditioner
  • Cruise control
  • Headlights and lighting
  • Electrical circuits
MitsubishiMan.ru © 2018–2026 • Mobile version • Articles about Mitsubishi • Contacts • Sitemap: EN BG BY UA RS HR RO PL SK HU • Site search • Bookmark
Colt 2 and 3 (1983-1993) · Colt 4 and 5 (1991-2003) · Colt 5 (1995-2003) · Lancer 3 and 5 (1984-1992) · Lancer 9 (2000-2007) · Galant 5 (1983-1989) · Galant 6 and 7 (1987-1998) · L200 4 (2005-2014) · Outlander 1 (2003-2008) · Pajero 1 and 2 (1982-1999) · Pajero 4 (2006-2021) · Carisma (1995-2004) · Space Star (1998-2005) ·
This resource sets cookies 🍪 to avoid bothering you with repeated data entry.