



2. Disconnect the high pressure fuel hose flange from the fuel manifold.
Caution: Cover the high pressure hose flange connection with the fuel rail with a rag to prevent fuel from splashing due to residual pressure in the high pressure line.
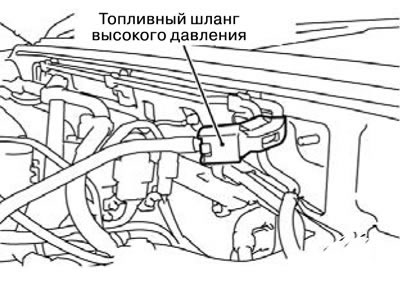
3. Disconnect the coupling and the bypass bolt from the special tool (adapter hose MD 998709) and connect a special tool instead of them (hose adapter MD 998742).
4. Screw the pressure gauge for measuring fuel pressure into the adapter hose assembled in p.3. In this case, be sure to install a suitable sealing ring (gasket) between the pressure gauge nipple and the special tool to prevent fuel leaks.
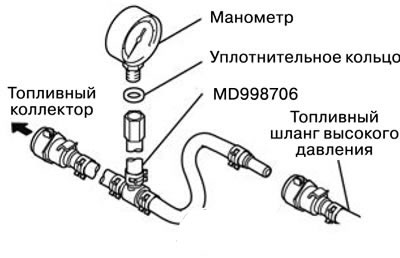
5. Install the special tool collected in p. 3 and 4 between the fuel manifold and the flange of the high pressure fuel hose.
6. Using a wire with an alligator clip, connect the positive (+) terminal of the battery to terminal 2 of the 3-pin service connector of the fuel pump, as shown in the figure, thereby turning on the latter. Check (if there is pressure in the high pressure line) absence of fuel leaks at the connection points of the pressure gauge and special tools.
7. To stop the fuel pump, disconnect the wire with the crocodile clip from the battery.
8. Start the engine and let it idle.
9. With the engine idling, measure the fuel pressure.
Nominal value: Approximately 265 kPa at base idle speed.
10. Disconnect the vacuum hose from the fuel pressure regulator, cover its opening with your finger and measure the pressure.
Nominal value: 324 kPa at base idle speed.
11. Check that the fuel pressure at idle does not drop even after pressing the accelerator pedal several times.
12. Press the accelerator pedal several times in a row, lightly squeeze the fuel return hose with your fingers to feel the presence of fuel pressure in the hose.
Note: If fuel consumption is low, there will be no pressure felt in the fuel return hose.
13. If any of the fuel pressure test results given in paragraphs 9-12 do not correspond to the norm, then search for faults and eliminate them in accordance with the table below.
| Sign of malfunction | Probable cause | Troubleshooting |
Low fuel pressure Fuel pressure drops after pressing the accelerator pedal (increasing engine speed) No pressure in the fuel return hose | Clogged fuel filter | Replace the fuel filter |
| Fuel leaks into the fuel return line due to poor seating of the fuel pressure regulator valve or improper spring tension | Replace the fuel pressure regulator | |
| Low pressure created by the fuel pump | Replace the fuel pump | |
| Increased fuel pressure | Fuel pressure regulator valve sticking | Replace the fuel pressure regulator |
| Clogged fuel return hose or tube | Clean or replace the hose or tube | |
| Same fuel pressure with vacuum hose connected and disconnected from fuel pressure regulator | Damaged vacuum hose or clogged fuel pressure regulator nipple | Replace the vacuum hose or clean the nipple |
14. Turn off the engine and check for changes in the fuel pressure gauge readings. The fuel system is in good working order if the pressure in the fuel line does not decrease within 2 minutes. If the pressure drops, then search for the fault and eliminate it in accordance with the table.
| Sign of malfunction | Probable cause | Troubleshooting |
| After the engine stops, the fuel pressure gradually drops | The injector is leaking | Replace the injector |
| Fuel pressure regulator valve leaks (valve seat not tight) | Replace the fuel pressure regulator | |
| After the engine stops, the fuel pressure drops immediately | The check valve in the fuel pump remains open | Replace the fuel pump |
15. Bleed residual pressure in the high pressure fuel line.
16. Disconnect the pressure gauge and special tool from the fuel manifold.
Caution: Cover the hose flange and adapter connections with a rag to avoid fuel splashing due to residual fuel pressure in the high-pressure line.
17. Replace the O-ring seal on the high pressure hose flange with a new one. Before installation, be sure to lubricate the O-ring with clean engine oil.
18. Install the high pressure fuel hose pipe flange into the fuel manifold and tighten the flange mounting bolts to 5 Nm.
19. Check for fuel leaks.
20. To turn on the fuel pump, connect the terminal of the fuel pump service connector to the "+" terminal of the battery.
21. Check for leaks in the fuel line when the latter is under pressure.