
English Русский
Български
Беларускі
Український
Српски
Hrvatski
Română
Polski
Slovenský
Magyar
Articles Bookmark Contacts Sitemap   
Company Audi Company Ford Company Hyundai Company Kia Company Mazda Company Mercedes-Benz Company Nissan
MitsubishiMan.ru


Home Colt Lancer Galant L200 Outlander Pajero Others
Galant 6 and 7 (1987-1998) Galant 5 (1983-1989, petrol)

Checking and adjusting the ignition timing (Mitsubishi Galant 5)

  • Home
  • Galant
  • 5 (1983-1989, petrol)
  • General information
  • Maintenance
  • Checking and adjusting the ignition timing
0
Note: The ignition timing setting should be checked periodically on carbureted models only. On fuel injected models, the ignition timing setting should only be checked if the distributor or crankshaft angle sensor has been removed, the mounting bolt has become loose, or the original factory ignition timing setting has been altered.


1. This procedure requires special tools. The engine must be at normal operating temperature and the air conditioner must be off. Make sure the idle speed is within specification (section 20).

2. Apply the parking brake and block the wheels to prevent the car from rolling. The transmission must be in Park (automatic) or Neutral (manual).

3. Locate the ignition timing marks on the engine side of the drive belt (they should be visible from above after opening the hood). There is a slot on the crankshaft pulley or on the damper, and a plate with protruding numbers is attached to the timing belt cover. Clean the plate with solvent so that the numbers are easier to see.
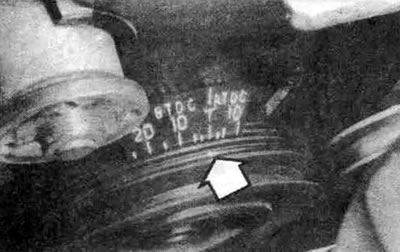


37.3. Marks for setting the ignition timing on the pulley or damper and a plate with a scale


4. Mark the slot in the pulley/damper with chalk or white paint.


5. Mark the point on the spark timing plate that corresponds to the spark timing specified on the emission control system information label.

6. Connect the stroboscope according to the manufacturer's instructions (it is preferable to use a stroboscope with an inductive sensor). In general, the power wires are connected to the battery terminals, and the sensor wire is connected to the spark plug wire of the first cylinder. The spark plug of the first cylinder is the one closest to the drive belt.

Caution: If a strobe light with an inductive sensor is not available, do not pierce the high-voltage wire to connect the sensor wire. Instead, use an adapter that is connected between the spark plug and the high-voltage wire. If the high-voltage wire insulator is damaged, the secondary voltage will short to ground, causing a misfire.


7. On fuel injected models, locate the ignition timing connector and ground it with a jumper wire. This is to prevent the computer from trying to advance the ignition timing while making adjustments.
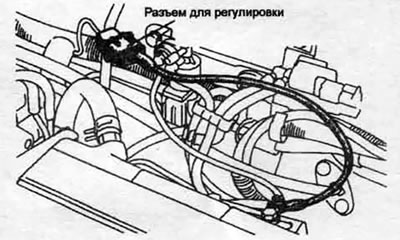


37.7 On fuel injected models, there should be a connector in the engine bay as shown. Using an auxiliary wire, short the connector contact to ground (Precis model shown, others are similar)


8. Make sure the strobe light wires are located away from the drive belt and fan, then start the engine.

9. Once the idle speed has stabilized, aim the strobe light at the ignition timing marks - beware of moving engine parts.

10. The mark on the pulley/damper will be stationary. If it coincides with the required point on the ignition timing plate, the ignition is set correctly.

11. If the marks do not match, adjustment is required. Loosen the distributor or crankshaft angle sensor mounting nut and slightly turn the distributor or crankshaft angle sensor until the marks match.
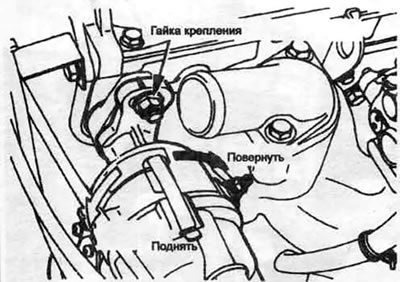


37.11. To adjust the ignition, after loosening the fastening nut, turn the distributor housing (or crankshaft angle sensor)


[The text of the article was taken from the website: mitsubishiman.ru]

12. Tighten the nut and check the ignition timing again.

13. Turn off the engine and disconnect the strobe light (and adapter, if used).
This article is available at: russian, bulgarian, belarusian, ukrainian, serbian, croatian, romanian, polish, slovak, hungarian
This article was reviewed by: Vladimir Glazunov
Share with friends:
◀ Previous
Galant 5: Maintenance
Next ▶

Emission control system check and tank replacement
Changing oil in manual transmission
Replacing the working fluid and filter of the automatic transmission
Changing brake fluid (Precis models only)
Checking, lubricating and adjusting rear wheel bearings (only with drum brakes)
Checking and replacing the positive crankcase ventilation (PCV) valve
Replacing the oxygen sensor
Similar materials for other Mitsubishi models

➤ Checking and adjusting the ignition timing angle Mitsubishi Colt 2 and 3 (1983-1993)
➤ Checking/setting ignition timing Mitsubishi Lancer 3 and 5 (1984-1992)
➤ Checking and adjusting the tension of auxiliary drive belts Mitsubishi L200 4 (2005-2014, diesel)
➤ Checking the ignition coil relay Mitsubishi Outlander 1 (2003-2008)
➤ Checking the ignition timing angle Mitsubishi Pajero 4 (2006-2021)
➤ Checking and adjusting the ignition timing (SOHC) Mitsubishi Carisma (1995-2004)
Link in different formats to this article
Comments and feedback from visitors
No comments yet


Add up two numbers 33 + 35


Galant 6 and 7 (1987-1998) 
  • General information
  • Introduction to guide
  • User manual
  • Driving and operation
  • Maintenance
  • Power unit
  • Dismantling the engine
  • Engine overhaul
  • Cooling and heating
  • Power and exhaust systems
  • Engine electrical equipment
  • Engine management systems
  • Transmission
  • Mechanical gearbox
  • Automatic gearbox
  • Clutch
  • Drive shafts and transfer case
  • Chassis and running gear
  • Brake system
  • Car suspension
  • Steering
  • Body and interior
  • Exterior (external elements)
  • Interior (internal elements)
  • Doors, locks and windows
  • Electrical equipment
  • Equipment and devices
  • Wiring diagrams Galant
  • Wiring diagrams Mirage
  • Wiring diagrams Diamante
Galant 5 (1983-1989, petrol) 
  • General information
  • Troubleshooting
  • Maintenance
  • Power unit
  • Engine repair
  • Engine overhaul
  • Cooling and heating
  • Fuel and exhaust system
  • Engine electrical equipment
  • Reducing exhaust toxicity
  • Transmission
  • Manual gearbox
  • Automatic gearbox
  • Clutch and drive shafts
  • Chassis and running gear
  • Brake system
  • Car suspension
  • Steering
  • Body and interior
  • Exterior (external elements)
  • Interior (internal elements)
  • Doors, locks and windows
  • Electrical equipment
  • Equipment and devices
  • Electrical diagrams
MitsubishiMan.ru © 2018–2026 • Mobile version • Articles about Mitsubishi • Contacts • Sitemap: EN BG BY UA RS HR RO PL SK HU • Site search • Bookmark
Colt 2 and 3 (1983-1993) · Colt 4 and 5 (1991-2003) · Colt 5 (1995-2003) · Lancer 3 and 5 (1984-1992) · Lancer 9 (2000-2007) · Galant 5 (1983-1989) · Galant 6 and 7 (1987-1998) · L200 4 (2005-2014) · Outlander 1 (2003-2008) · Pajero 1 and 2 (1982-1999) · Pajero 4 (2006-2021) · Carisma (1995-2004) · Space Star (1998-2005) ·
This resource sets cookies 🍪 to avoid bothering you with repeated data entry.