
English Русский
Български
Беларускі
Український
Српски
Hrvatski
Română
Polski
Slovenský
Magyar
Articles Bookmark Contacts Sitemap   
Company Audi Company Ford Company Hyundai Company Kia Company Mazda Company Mercedes-Benz Company Nissan
MitsubishiMan.ru


Home Colt Lancer Galant L200 Outlander Pajero Others
Pajero 4 (2006-2021) Pajero 1 and 2 (1982-1999)

Removal and installation of 2.6L engine (Mitsubishi Pajero 1)

  • Home
  • Pajero
  • 1 (1982-1999)
  • Power unit
  • Gasoline engines
  • Removal and installation of 2.6L engine
0
Contents: Removal ⤓ Installation ⤓
Attention! To dismantle engines of all modifications, it is necessary to remove the transmission, transfer case and front propeller shaft (see subsection 9.3.6, subsection 9.1.6 and subsection 9.3.9). When dismantling the engine, apply marks of mutual orientation to the removed units and the hood, clearly mark all disconnected wires and hoses. When removing 3.0L and 3.5L engines, do not allow the temporarily disconnected air conditioner and power steering pump to hang down by the hoses. Please note that when removing the engine, you should be extremely careful, since the gaps between the engine and the body panels are small, and the unit itself has significant weight.


Disconnectable hoses and wires when removing a 4-cylinder engine
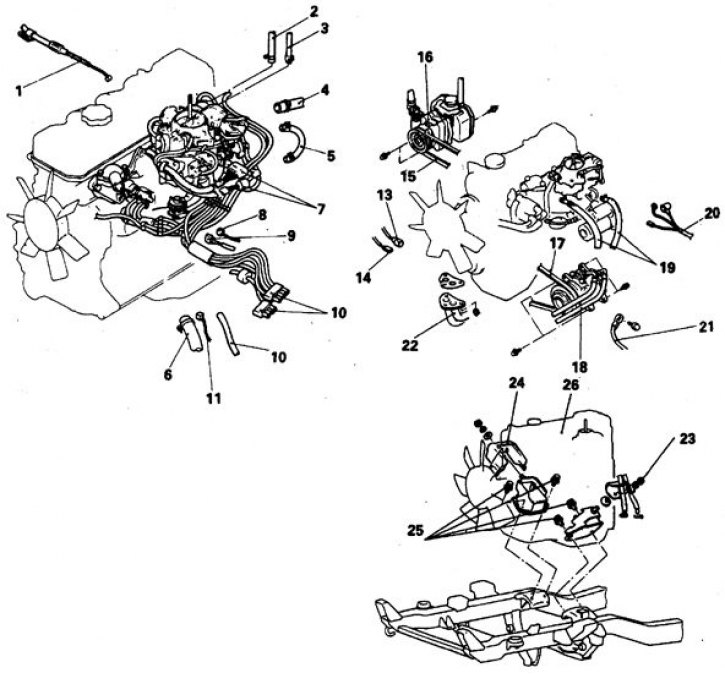


1. Throttle cable; 2. Heater hose; 3. Brake booster hose; 4. Cooling system bypass hose; 5. Cooling system hose; 6. Radiator hose; 7. Engine control system harness; 8. Air Conditioner Fluid Temperature Sensor Connector; 9. Air Conditioner Coolant Temperature Gauge Sensor Connector; 10. Vacuum hose; 11. Engine Management System Fluid Temperature Sensor Connector; 13. Oxygen sensor connector; 14. Oil pressure sensor connector; 15. Power steering pump belt; 16. Power steering pump; 17. Air conditioning compressor belt; 18. Air conditioning compressor; 19. Gasoline; 20. Generator connector; 21. Ground wire; 22. Front exhaust pipe; 23. Fuel line mounting bracket; 24. Shield; 25. Front support bolt; 26. Engine


Removal


1. Depressurize the air conditioner (if provided) at the car service.

2. Remove the hood.

3. Raise the vehicle and remove the engine shields.

4. Drain the cooling system.

5. Drain the oil from the transmission, engine, transfer case and front differential.

6. Remove the air filter.

7. Remove both fan shrouds.

8. Remove the radiator.

9. Disconnect the throttle cable.

10. Disconnect the heater, cooling system and brake booster hoses from the engine.

11. Disconnect the large multi-pin connector from the engine management system wiring.

12. Disconnect the vacuum hose and unscrew the coolant temperature gauge sensor.

13. Disconnect the wires from the oxygen sensor and the oil pressure sensor.

14. Remove the power steering pump belt by loosening the pump mounting bolts.

15. Remove the power steering pump and set it aside without disconnecting it from the line.

16. Remove the belt and air conditioning compressor. Move the unit to the side without disconnecting it from the line and secure it.

17. Disconnect the fuel hoses after decompression (on injection engines).

18. Disconnect the 3 connectors on the generator.

19. Disconnect the ground wire from the cylinder block.

20. Disconnect the exhaust pipe from the manifold and secure the pipe with a wire.

21. Disconnect all hoses from the absorber tank that lead to the engine compartment bulkhead.

22. Remove the fuel line mounting bracket on the engine.

23. Attach the hoist and lift the engine.

24. Remove the shield from the right support.

25. Loosen the bolts securing the engine mounts to the frame.


26. Carefully lift the engine and remove it from the engine compartment. Place the engine on stands (not on a pallet).

Installation


The engine is installed in reverse order. First of all, install the engine, tighten the support bolts and tighten them to 35 Nm. Replace the exhaust pipe gasket on the manifold and the mounting bolts. Tighten the radiator mounting bolts to 7 Nm. Fill with fluid, oil and start the engine. After warming up, restore fluid levels. Have your air conditioner refilled at a car service center. Adjust cable, belts, idle and ignition.
This article is available at: russian, bulgarian, belarusian, ukrainian, serbian, croatian, romanian, polish, slovak, hungarian
This article was reviewed by: Arseny Pavlov
Share with friends:
◀ Previous
Pajero 1 and 2: Gasoline engines
Next ▶

Engine technical data
Checking the compression in engine cylinders
Engine Overhaul — Alternatives
Dismantling the power unit
Checking the compression in engine cylinders — general information
Removal and installation of 12-valve 3.0L engine
Removal and installation of 24-valve 3.0L engine
Removal and installation of 3.5L engine
Cylinder Head Cover — Removal and Installation
2.0L Engine Rollers and Rocker Arms — Removal and Installation
Similar materials for other Mitsubishi models

➤ Engine oil change Mitsubishi Colt 4 and 5 (1991-2003)
➤ Engine Starting Assistance Mitsubishi Lancer 3 and 5 (1984-1992)
➤ Starting the engine from an auxiliary power source Mitsubishi Galant 6 and 7 (1987-1998)
➤ Electronic immobilizer (anti-theft system that blocks… Mitsubishi L200 4 (2005-2014, diesel)
➤ Electronic immobilizer (engine start blocking system) Mitsubishi Outlander 1 (2003-2008)
➤ Starting the engine from an external power source Mitsubishi Carisma (1995-2004)
Link in different formats to this article
Comments and feedback from visitors
No comments yet


Add up two numbers 12 + 16


Pajero 4 (2006-2021) 
  • General information
  • User manual
  • Troubleshooting
  • Maintenance
  • Technical specifications
  • Power unit
  • Engine repair
  • Cooling system
  • Lubrication system
  • Fuel system
  • Engine management system
  • Intake and exhaust system
  • Engine electrical equipment
  • Transmission
  • Clutch
  • Manual gearbox
  • Automatic gearbox
  • Drive shafts
  • Chassis and running gear
  • Front suspension
  • Rear suspension
  • Brake system
  • Steering
  • Body and interior
  • Exterior (external elements)
  • Interior (internal elements)
  • Doors, locks and windows
  • Body dimensions
  • Electrical equipment
  • Safety system (SRS)
  • Air conditioner
  • Equipment and devices
  • Electrical diagrams
Pajero 1 and 2 (1982-1999) 
  • General information
  • User manual
  • Seats and seat belts
  • Instruments and controls
  • Driving and operation
  • Maintenance
  • Power unit
  • Gasoline engines
  • Diesel engines
  • Ignition system
  • Engine electrical equipment
  • Cooling and lubrication system
  • Power and exhaust system
  • Fuel system (gasoline)
  • Fuel system (diesel)
  • Transmission
  • Clutch
  • Mechanical gearbox
  • Automatic gearbox
  • Drive shafts and axles
  • Chassis and running gear
  • Front suspension
  • Rear suspension
  • Steering
  • Brake system
  • Body and interior
  • Exterior (external elements)
  • Interior (internal elements)
  • Doors, locks and windows
  • Electrical equipment
  • Equipment and devices
  • Heater and air conditioner
  • Cruise control
  • Headlights and lighting
  • Electrical circuits
MitsubishiMan.ru © 2018–2026 • Mobile version • Articles about Mitsubishi • Contacts • Sitemap: EN BG BY UA RS HR RO PL SK HU • Site search • Bookmark
Colt 2 and 3 (1983-1993) · Colt 4 and 5 (1991-2003) · Colt 5 (1995-2003) · Lancer 3 and 5 (1984-1992) · Lancer 9 (2000-2007) · Galant 5 (1983-1989) · Galant 6 and 7 (1987-1998) · L200 4 (2005-2014) · Outlander 1 (2003-2008) · Pajero 1 and 2 (1982-1999) · Pajero 4 (2006-2021) · Carisma (1995-2004) · Space Star (1998-2005) ·
This resource sets cookies 🍪 to avoid bothering you with repeated data entry.