



Contents: Removal ⤓ Installation ⤓
Attention! To dismantle engines of all modifications, it is necessary to remove the transmission, transfer case and front propeller shaft (see subsection 9.3.6, subsection 9.1.6 and subsection 9.3.9). When dismantling the engine, apply marks of mutual orientation to the removed units and the hood, clearly mark all disconnected wires and hoses. When removing 3.0L and 3.5L engines, do not allow the temporarily disconnected air conditioner and power steering pump to hang down by the hoses. Please note that when removing the engine, you should be extremely careful, since the gaps between the engine and the body panels are small, and the unit itself has significant weight.
Disconnectable units, hoses and wires when dismantling a 12-valve 3.0L engine
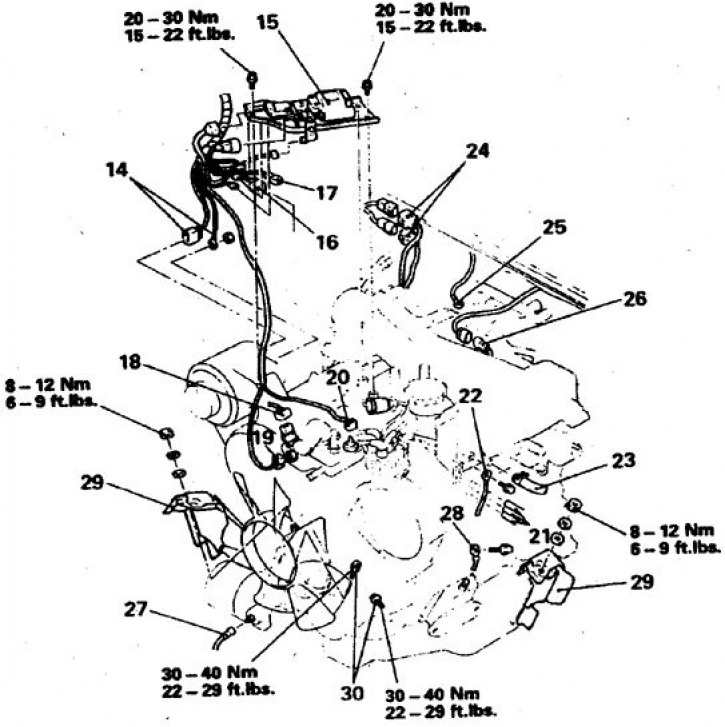
14. Generator connector; 15. Ignition coil and power switching unit; 16. Idle speed control motor connector; 17. Throttle position sensor connector; 18. Temperature sensor connector for air conditioner; 19. Engine Management System Fluid Temperature Sensor Connector; 20. Liquid temperature gauge sensor connector; 21. Joint of the exhaust gas suction vacuum hose; 22, 25, 28. Ground connection bus; 23. Brake booster hose; 24. Engine control system harness; 26. Recirculation system temperature sensor; 27. Oil pressure sensor connector; 29. Shield; 30. Engine support bolt
Removal
1. Remove the hood.
2. Raise the vehicle and remove the engine shields.
3. Perform decompression. To do this, disconnect the connector at the rear of the fuel tank, start the engine and after it stops, turn off the ignition.
4. Disconnect the ground.
5. Drain the fluid from the cooling system. Drain the oil from the transmission and engine.
6. Disconnect the radiator hoses and other cooling system hoses from the engine.
7. Remove the radiator.
8. Remove the fan shroud.
9. Disconnect the exhaust pipe from the manifold.
10. Remove the transmission (see subsection 9.3.6).
11. Remove the air filter duct.
12. Disconnect the throttle cable.
13. Disconnect the wires from the air conditioner.
14. Remove the air conditioner without disconnecting it from the line, move it to the side and secure it.
15. Remove the power steering pump and set it aside without disconnecting it from the line.
16. Disconnect the cruise control hose (if provided).
17. Disconnect the fuel hoses (starting with the high pressure hose, which you should cover with a rag before disconnecting), disconnect the fuel system vacuum hose.
18. Remove the throttle position sensor, ignition coil, power transistor assembly, EGR temperature sensor, all fluid temperature sensors, oil pressure sensor, generator and thermal switches.
19. Remove the engine ground wires.
20. Disconnect the exhaust vacuum hose and the brake booster hose.
21. Disconnect the connector from the idle air control motor.
22. Disconnect the remaining wires.
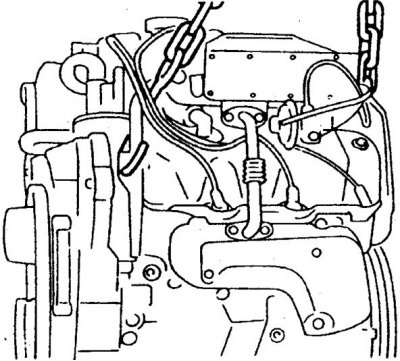
23. Attach the hoist and lift the engine.
24. Remove the engine mount shields and unscrew the bolts securing the engine mounts to the frame.
25. Carefully lift the engine and remove it from the engine compartment. Place the engine on stands (not on a pallet).
Installation
The engine is installed in reverse order. First of all, install the engine, tighten the support bolts and tighten them to a torque of 30-40 N·m. Replace the exhaust pipe gasket on the manifold and the mounting bolts, as well as the fuel line sealing ring. Tighten the radiator mounting bolts to 8–11 N·m.
Fill with liquid, oil and start the engine. After warming up, restore fluid levels. Re-adjust cable, belts, idle and ignition.