
English Русский
Български
Беларускі
Український
Српски
Hrvatski
Română
Polski
Slovenský
Magyar
Articles Bookmark Contacts Sitemap   
Company Audi Company Ford Company Hyundai Company Kia Company Mazda Company Mercedes-Benz Company Nissan
MitsubishiMan.ru


Home Colt Lancer Galant L200 Outlander Pajero Others
Pajero 4 (2006-2021) Pajero 1 and 2 (1982-1999)

Checking the brake disc (Mitsubishi Pajero 4)

  • Home
  • Pajero
  • 4 (2006-2021)
  • Chassis and running gear
  • Brake system
  • Checking the brake disc
0
Contents: Checking the thickness of the brake…⤓ Checking the brake disc runout ⤓ Beat correction ⤓
Attention: When servicing disc brakes, special attention must be paid to compliance with the technical requirements for disc brakes, which ensure the normal operation of disc brakes. Before performing mechanical or grinding restoration operations on the brake disc, the following parameters must be checked.


When servicing brake discs, it is necessary to carefully check that the discs comply with the permissible service values to maintain normal brake operation.

Parameters to be checkedNotes
Scratches, rust, wear and impregnation of the disc surface with wear products of the liningsIf the vehicle has been stationary for a period of time, the part of the disc surface that is not in contact with the brake pads will become rusty, resulting in increased noise and vibration. If grooves and scratches that have appeared on the surface of the disc as a result of intensive wear are not removed when reinstalling new brake pads, normal contact between the disc and the brake pad linings will not be ensured.
Beating or wearExcessive disc runout or wear will result in increased resistance to pressing the brake pedal due to pulsation of the wheel brake cylinder piston.
Change thicknessIf the disc thickness is not uniform around the perimeter, this will cause the brake pedal to vibrate.
Hardening or warping (non-flatness)Improper maintenance or overheating will cause the disc to warp (non-flatness).


Checking the thickness of the brake disc


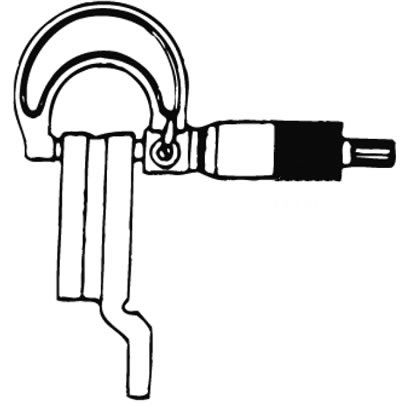
1. Using a micrometer, measure the thickness of the disc at eight points approximately every 45° at a distance of 10 mm from the outer edge of the disc. Brake disc thickness: Nominal value:
  • Short wheelbase: 26.0 mm (front), 22.0 mm (rear).
  • Long wheelbase: 28.0 mm (front), 18.0 mm (rear).
  • Minimum allowable value: Short wheelbase: 24.4 mm (front), 20.4 mm (rear)
  • Long wheelbase: 26.0 mm (front), 16.0 mm (rear)
  • Change thickness (in at least 8 positions).
  • The difference in disc thickness between any measured points must not exceed 0.015 mm.

2. The brake disc must be replaced if its thickness has become less than the minimum permissible value. If the difference in disk thickness exceeds the permissible value, then it is necessary to replace the disk or turn it on a special lathe (such as "MAD, DL-8700PF" or similar).


Checking the brake disc runout


1. Remove the disc brake caliper assembly with the mandrel and hang it on a cord.

2. Inspect the surface of the disc for cavities, rust and cracks. Clean the disc thoroughly and remove all rust.

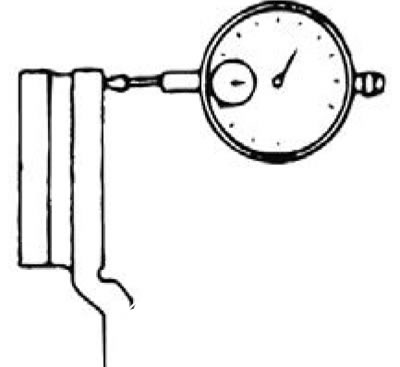
3. Attach a pointer-type indicator approximately 5 mm from the outer edge of the brake disc and measure the disc runout.


Maximum allowable value: 0.06 mm or less

Note: Tighten the wheel nuts to secure the brake disc to the hub.


Beat correction


1. If the runout value of the brake disc is within or exceeds the limit value, it is necessary to change the relative position of the disc and hub, and then measure the runout again.

2. Before removing the brake disc, make marks with chalk on both sides of the wheel stud at the point of maximum runout.

3. Remove the brake disc and install the dial indicator as shown in the figure. By moving the hub in the axial direction, measure the axial clearance in the hub bearing.

Maximum allowable value: 0.00 mm

If the play is equal to or exceeds the maximum permissible value, disassemble the steering knuckle and hub and inspect each part.
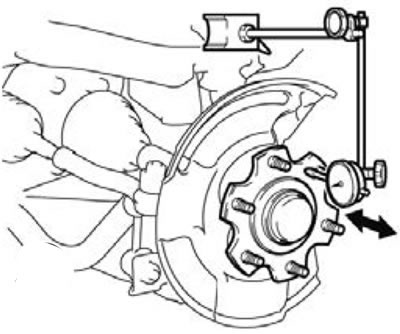


4. If the axial clearance in the hub bearing does not exceed the limit value, then turn the brake disc 180° from the chalk line, install it on the hub, and again repeat the measurement of the brake disc runout.

5. If the operations performed do not eliminate the increased runout of the disc, then it is necessary to replace the brake disc or process it on a special lathe (such as "MAD, DL-8700PF" or similar).
This article is available at: russian, bulgarian, belarusian, ukrainian, serbian, croatian, romanian, polish, slovak, hungarian
This article was reviewed by: Miroslav Rakov
Share with friends:
◀ Previous
Pajero 4: Brake system
Next ▶

Checking and replacing brake pads
Bleeding air from the brake hydraulic system
Checking the brake fluid level sensor
Checking the operation of the check valve
Checking the operation of the brake booster
Checking and adjusting the travel of the parking brake lever
Checking the Parking Brake Indicator Light Switch
Removal the brake pedal
Installing the brake pedal
Removal the brake booster
Similar materials for other Mitsubishi models

➤ Checking the thickness and lateral runout of the front… Mitsubishi Colt 4 and 5 (1991-2003)
➤ Checking the brake fluid level Mitsubishi Lancer 3 and 5 (1984-1992)
➤ Checking the proper functioning of the parking brake Mitsubishi Galant 6 and 7 (1987-1998)
➤ Checking the disc brake rotor Mitsubishi L200 4 (2005-2014, diesel)
➤ Checking the brake disc Mitsubishi Outlander 1 (2003-2008)
➤ Checking the thickness of the brake disc Mitsubishi Carisma (1995-2004)
Link in different formats to this article
Comments and feedback from visitors
No comments yet


Add up two numbers 20 + 28


Pajero 4 (2006-2021) 
  • General information
  • User manual
  • Troubleshooting
  • Maintenance
  • Technical specifications
  • Power unit
  • Engine repair
  • Cooling system
  • Lubrication system
  • Fuel system
  • Engine management system
  • Intake and exhaust system
  • Engine electrical equipment
  • Transmission
  • Clutch
  • Manual gearbox
  • Automatic gearbox
  • Drive shafts
  • Chassis and running gear
  • Front suspension
  • Rear suspension
  • Brake system
  • Steering
  • Body and interior
  • Exterior (external elements)
  • Interior (internal elements)
  • Doors, locks and windows
  • Body dimensions
  • Electrical equipment
  • Safety system (SRS)
  • Air conditioner
  • Equipment and devices
  • Electrical diagrams
Pajero 1 and 2 (1982-1999) 
  • General information
  • User manual
  • Seats and seat belts
  • Instruments and controls
  • Driving and operation
  • Maintenance
  • Power unit
  • Gasoline engines
  • Diesel engines
  • Ignition system
  • Engine electrical equipment
  • Cooling and lubrication system
  • Power and exhaust system
  • Fuel system (gasoline)
  • Fuel system (diesel)
  • Transmission
  • Clutch
  • Mechanical gearbox
  • Automatic gearbox
  • Drive shafts and axles
  • Chassis and running gear
  • Front suspension
  • Rear suspension
  • Steering
  • Brake system
  • Body and interior
  • Exterior (external elements)
  • Interior (internal elements)
  • Doors, locks and windows
  • Electrical equipment
  • Equipment and devices
  • Heater and air conditioner
  • Cruise control
  • Headlights and lighting
  • Electrical circuits
MitsubishiMan.ru © 2018–2026 • Mobile version • Articles about Mitsubishi • Contacts • Sitemap: EN BG BY UA RS HR RO PL SK HU • Site search • Bookmark
Colt 2 and 3 (1983-1993) · Colt 4 and 5 (1991-2003) · Colt 5 (1995-2003) · Lancer 3 and 5 (1984-1992) · Lancer 9 (2000-2007) · Galant 5 (1983-1989) · Galant 6 and 7 (1987-1998) · L200 4 (2005-2014) · Outlander 1 (2003-2008) · Pajero 1 and 2 (1982-1999) · Pajero 4 (2006-2021) · Carisma (1995-2004) · Space Star (1998-2005) ·
This resource sets cookies 🍪 to avoid bothering you with repeated data entry.