



Contents: Disassembly ⤓ Cleaning the starter ⤓ Checking the freewheel clutch ⤓ Checking the brushes ⤓ Assembly ⤓
Disassembly
To disassemble, perform the following operations in sequence.
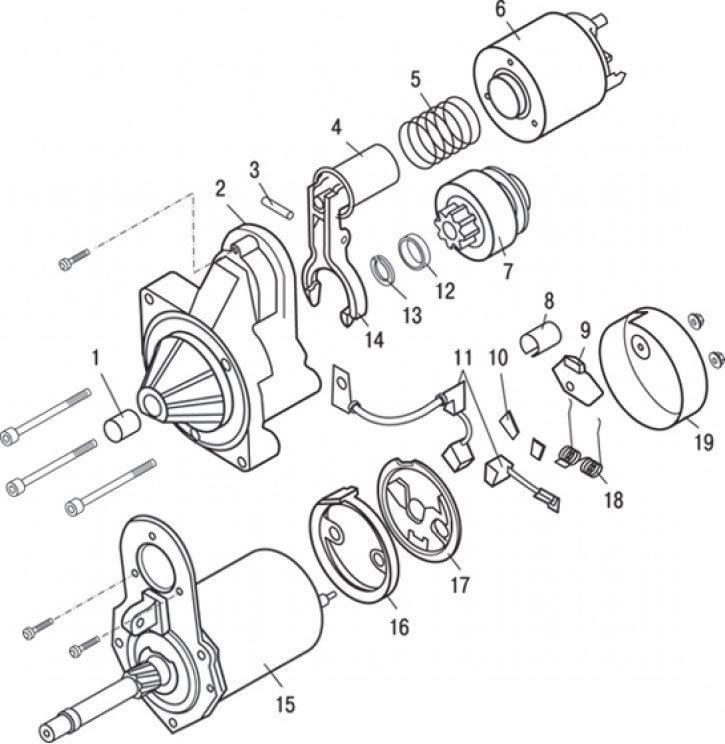
Fig. 9.26. Starter with a reduction planetary gear: 1 – bearing sleeve; 2 – front cover; 3 – drive lever axis; 4 – core; 5 – spring; 6 – traction relay; 7 – freewheel clutch; 8 – protective cover; 9 – rubber gasket; 10 – contact plates; 11 – brush; 12 – limiting ring; 13 – retaining ring; 14 – drive lever; 15 – starter motor assembly; 16 – sealing insert; 17 – brush holder; 18 – brush spring; 19 – rear cover
1. Unscrew the nuts and remove the rear cover 19 (Fig. 9.26).
2. Remove the rubber gasket 9.
3. Remove the protective cover 8.
4. Remove brush spring 18.
5. Remove contact plates 10.
6. Remove brushes 11.
7. Remove brush holder 17 and sealing insert 16.
8. Loosen the bolts and remove the front cover 2.
9. Remove bearing sleeve 1.
10. Loosen the screws and remove the traction relay 6.
11. Remove spring 5.
12. Knock out the axle of the drive lever 3.
13. Remove core 4.
14. Remove drive lever 14.
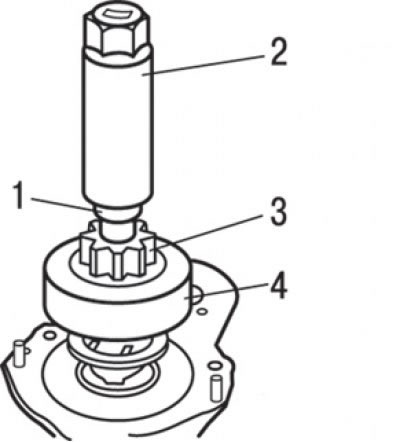
Fig. 9.27. Moving the limiting ring down: 1 – limiting ring; 2 – socket head; 3 – drive gear; 4 – freewheel clutch
15. Using a suitable socket head, push the limit ring down (Fig. 9.27).
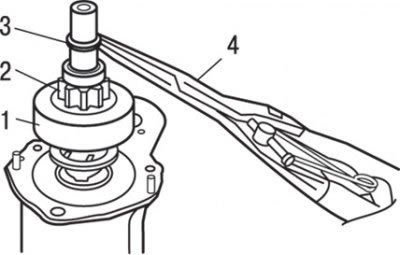
Fig. 9.28. Removing the limiting ring: 1 – freewheel clutch; 2 – drive gear; 3 – retaining ring; 4 – special pliers for removing retaining rings
16. Using special pliers, remove the retaining ring, then the limiting ring and the freewheel clutch (Fig. 9.28).
Cleaning the starter
Do not immerse the parts in cleaning solutions (solvents). Such washing of the pole assembly with the stator winding and/or anchor will damage the insulation of the windings. Wipe these parts only with a cloth.
Do not immerse the freewheel clutch assembly with the drive gear in a cleaning solution (solvent). The freewheel clutch is factory-pre-lubricated with grease, so the solvent will wash the grease out of the clutch.
The freewheel clutch assembly with the drive gear can be wiped with a brush soaked in a cleaning solution and then wiped dry with a cloth.
Checking the freewheel clutch
1. Hold the clutch housing with your hand and rotate the drive gear. The gear should rotate smoothly, without jamming, in one direction and not rotate in the opposite direction. If the gear jams or rotates in both directions, replace the freewheel clutch assembly.
2. Check the drive pinion for excessive wear or scoring. If any are found, replace the freewheel assembly. If the drive pinion is damaged, also check the flywheel/torque converter (AT) ring gear for scoring or excessive wear.
Checking the brushes
Check the length of the brush, which should be at least 11 mm.
(The text of the article was obtained from the website www.mitsubishiman.ru)
Assembly
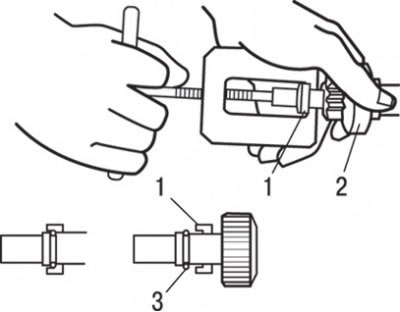
Fig. 9.29. Installing the limiting and retaining rings: 1 – limiting ring; 2 – freewheel clutch; 3 – retaining ring
Assembly of the direct drive starter is carried out in the reverse order of disassembly, taking into account the following: using a suitable puller, place the overrunning clutch limiting ring on the retaining ring (Fig. 9.29).