
English Русский
Български
Беларускі
Український
Српски
Hrvatski
Română
Polski
Slovenský
Magyar
Articles Bookmark Contacts Sitemap   
Company Audi Company Ford Company Hyundai Company Kia Company Mazda Company Mercedes-Benz Company Nissan
MitsubishiMan.ru


Home Colt Lancer Galant L200 Outlander Pajero Others
Carisma (1995-2004) Space Star (1998-2005)

Checking the oxygen concentration sensor (Mitsubishi Space Star)

  • Home
  • Mitsubishi
  • Space Star (1998-2005)
  • Power unit
  • Fuel injection system GDI
  • Checking the oxygen concentration sensor
0
The heated oxygen sensor detects the oxygen concentration in the exhaust gases and converts it into a voltage, which it transmits to the engine control unit (ECU).

The oxygen concentration sensor is equipped with a heater that maintains the sensor temperature within a certain range when the engine is running in all operating modes. Maintaining a certain sensor temperature allows the system to start up faster and operate in idle mode.

1. Disconnect the connector from the oxygen concentration sensor and connect a special tool (test wire harness) to the sensor connector (Fig. 6.28).
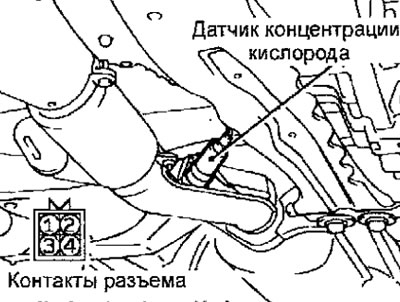


Fig. 6.28. Location of the oxygen concentration sensor


2. Make sure that the circuit is closed between contact 1 (red terminal of the test lead harness) and contact 3 (blue terminal of the test lead harness) of the oxygen concentration sensor connector (the resistance between the contacts is 11–18 ohms at a temperature of 20°C) (Fig. 6.29).
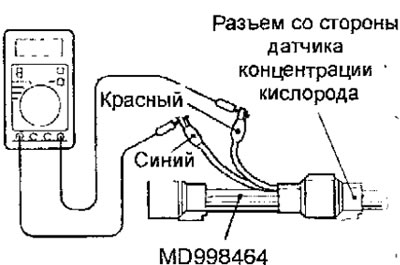


Fig. 6.29. Checking the conductivity between the contacts of the oxygen concentration sensor connector


3. If there is no conductivity, replace the oxygen concentration sensor.

4. Start and warm up the engine to a temperature of over 80°C.

5. Using wires with crocodile clips, connect contact 1 of the connector (red clip) to the positive terminal of the battery, and contact 3 of the connector (blue clip) to the negative terminal of the battery (Fig. 6.30).
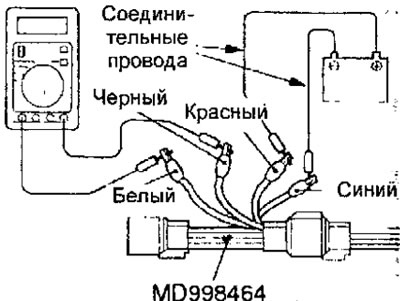


Fig. 6.30. Using jumper wires to test the oxygen concentration sensor


Warning: Be very careful when connecting the wires to the battery terminals, as the oxygen sensor may be damaged if the wires are connected incorrectly.


6. Connect a digital voltmeter to terminals 2 (black terminal) and 4 (white terminal) and measure the output voltage of the oxygen concentration sensor by changing the engine speed.

Oxygen concentration sensor output voltage: 0.6-1.0V

8. If the output voltage of the sensor differs from the required one, replace the sensor.
This article is available at: russian, bulgarian, belarusian, ukrainian, serbian, croatian, romanian, polish, slovak, hungarian
This article was reviewed by: Miroslav Rakov
Share with friends:
◀ Previous
Space Star: Fuel injection system GDI
Next ▶

Checking the accelerator pedal switch
Checking the accelerator pedal position sensor
Checking the throttle position sensor
Checking the coolant temperature sensor
Checking the engine air temperature sensor
Checking fuel injectors
Checking the throttle servo
Checking the Clutch Pedal Position Switch
High pressure fuel pump for engines manufactured since 1999
High pressure fuel pump for engines manufactured since 2000
Similar materials for other Mitsubishi models

➤ Oil pressure and pressure sensor — checking Mitsubishi Colt 4 and 5 (1991-2003)
➤ Checking the oil pressure switch sensor Mitsubishi Lancer 3 and 5 (1984-1992)
➤ Checking and replacing the coolant temperature sensor unit Mitsubishi Galant 6 and 7 (1987-1998)
➤ Checking the acceleration sensor Mitsubishi L200 4 (2005-2014, diesel)
➤ Checking the engine oil pressure switch sensor Mitsubishi Outlander 1 (2003-2008)
➤ Checking the oxygen sensor Mitsubishi Pajero 4 (2006-2021)
Link in different formats to this article
Comments and feedback from visitors
No comments yet


Add up two numbers 30 + 46


Carisma (1995-2004) 
  • General information
  • User manual
  • Maintenance
  • Power unit
  • Petrol engines 4G9
  • Diesel engines FBQT
  • Diesel engines F9Q
  • Cooling system
  • Injection system (MPI)
  • Injection system (GDI)
  • Engine electrical equipment
  • Transmission
  • Clutch
  • Mechanical gearbox
  • Automatic gearbox
  • Chassis and running gear
  • Steering
  • Brake system
  • Front suspension and shafts
  • Rear suspension
  • Body and interior
  • Exterior (external elements)
  • Interior (internal elements)
  • Doors, locks and windows
  • Air conditioner
  • Electrical equipment
  • Equipment and devices
  • Headlights and lighting
  • Electrical circuits
Space Star (1998-2005) 
  • General information
  • User manual
  • Maintenance
  • Power unit
  • Petrol engines 4G9
  • Petrol engines 4G1
  • Diesel engines F9Q1
  • Cooling system
  • Fuel injection system GDI
  • Fuel injection system MPI
  • Diesel supply system F9Q1
  • Ignition system
  • Diesel preheating
  • Transmission
  • Clutch
  • Mechanical gearbox
  • Automatic gearbox
  • Chassis and running gear
  • Suspension and drive shafts
  • Brake system
  • Steering
  • Body and interior
  • Exterior (external elements)
  • Interior (internal elements)
  • Doors, locks and windows
  • Heating and air conditioning
  • Electrical equipment
  • Power devices
  • Equipment and devices
MitsubishiMan.ru © 2018–2026 • Mobile version • Articles about Mitsubishi • Contacts • Sitemap: EN BG BY UA RS HR RO PL SK HU • Site search • Bookmark
Colt 2 and 3 (1983-1993) · Colt 4 and 5 (1991-2003) · Colt 5 (1995-2003) · Lancer 3 and 5 (1984-1992) · Lancer 9 (2000-2007) · Galant 5 (1983-1989) · Galant 6 and 7 (1987-1998) · L200 4 (2005-2014) · Outlander 1 (2003-2008) · Pajero 1 and 2 (1982-1999) · Pajero 4 (2006-2021) · Carisma (1995-2004) · Space Star (1998-2005) ·
This resource sets cookies 🍪 to avoid bothering you with repeated data entry.