English Русский
Български
Беларускі
Український
Српски
Hrvatski
Română
Polski
Slovenský
Magyar
Articles Bookmark Contacts Sitemap   
Company Audi Company Ford Company Hyundai Company Kia Company Mazda Company Mercedes-Benz Company Nissan
MitsubishiMan.ru


Home Colt Lancer Galant L200 Outlander Pajero Others
Pajero 4 (2006-2021) Pajero 1 and 2 (1982-1999)

Adjustments of automatic transmission controls (Mitsubishi Pajero 1)

  • Home
  • Pajero
  • 1 (1982-1999)
  • Transmission
  • Automatic gearbox
  • Adjustments of automatic transmission controls
0
Contents: Cars 1983-86. ⤓ Cars 1983-86. ⤓ Cars 1987-89. ⤓ Cars 1990-98. ⤓ Adjusting the Kick-Down Cable Gap…⤓

Cars 1983-86.


Adjusting the kick-down mode


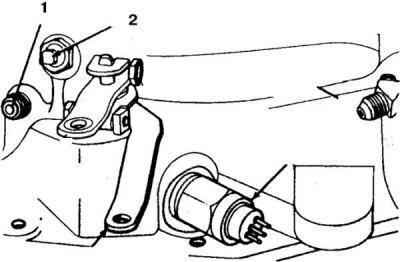
Kick-down mode adjustment screw (M904A)


The adjusting screw is located on the left side of the transmission housing.
1. To the cooler
2. Adjusting screw


1. Loosen the lock nut 5 turns.

2. Make sure the screw rotates without jamming.

The text of the article was obtained from the website MitsubishiMan

3. Tighten the screw to a torque of 7.8 N·m.

4. Loosen the screw by 3.5 turns and, holding it, tighten the lock nut to a torque of 40–55 N·m.

Adjusting the reverse and low gear engagement band (low-reverse)


Reverse and low gear adjustment screw
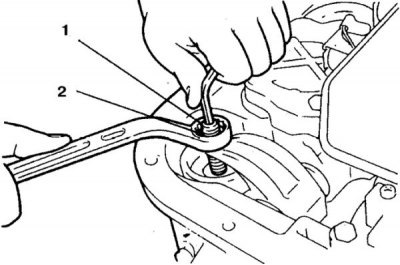


1. Screw; 2. Lock nut


1. Raise the vehicle.

2. Loosen the lock nut 5 turns.

3. Make sure the screw rotates without jamming.

4. Using the MD998358 wrench, tighten the screw to a torque of 4.9 Nm.

5. Loosen the screw 7 turns and, holding it, tighten the lock nut to a torque of 34–47 N·m.

6. Install the pan and tighten the bolts to 15–20 N·m.

7. Pour in the liquid.

Cars 1983-86.


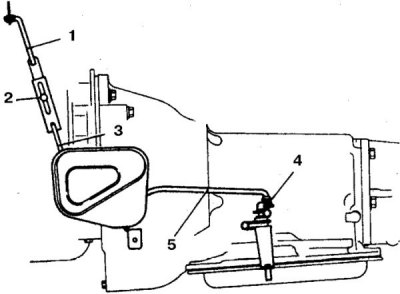
Adjusting the kick-down mode traction system (M904A)


1. Pull C; 2. Bolt; 3. Pull B; 4. Throttle control lever; 5. Thrust A


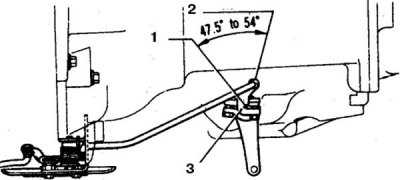
Checking the rotation of the throttle control rod (after adjusting the remaining rods)


1. Full throttle position; 2. Idle position; 3. Lever


1. Loosen the bolts so that rods B and C move freely.

2. Warm up the engine to 80°C and make sure that fast idle is completely switched off (the choke lever cam of the carburetor should not touch the throttle lever cam).


3. Apply thrust A (or throttle control lever) to the idle speed limiter and set the rods to the idle speed position.

4. Tighten the bolt connecting rods B and C.

5. Check that the transmission lever rotates 47.5–54° when the throttle valve is opened, and that when the throttle rod is slowly returned from the fully open position, the transmission lever returns to the idle position under the action of the spring.

Cars 1987-89.


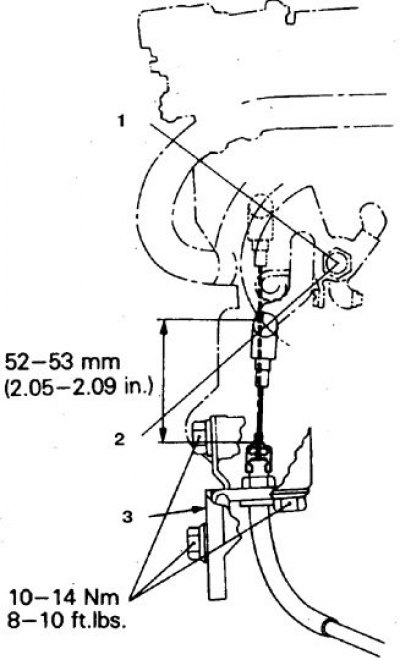
Adjusting the kick-down drive (KM148)


1. Fully open damper; 2. Idle speed; 3. Bracket


1. Check the idle speed (after adjusting the idle speed, adjust the throttle cable).

2. Check the distance between the cable limiter and the cap, which should be 52–53 mm with the throttle fully open.

3. If necessary, adjust the distance by moving the cable bracket with the bolts loosened.

Cars 1990-98.


Adjusting the Kick-Down Cable Gap (cars with 3.5 l and 3.0 l engines 1990-94)
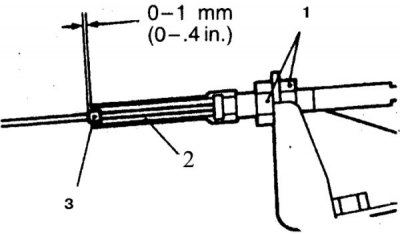


1. Nuts; 2. Cover; 3. Cable limiter


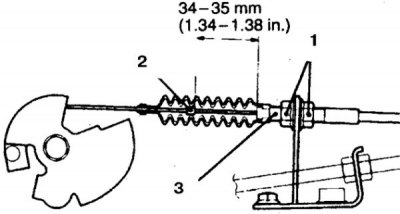
Adjusting the Kick-Down Cable Gap (car with 3.0 l engine, 1995)


1. Nuts; 2. Cable limiter; 3. Cover


Engine 3.5L and 3.0L (1990-94)


1. Press the throttle pedal and check the distance between the cable limiter and the dust cover, which should be 0-1 mm.

2. If necessary, adjust the distance by turning the adjusting nuts of the cable sheath.

3.0L Engine (1995)


3. Remove the cable cover and check the distance between the cable stop and the cover, which should be 34–35 mm with the throttle fully open.

4. If necessary, adjust the distance by turning the adjusting nuts of the cable sheath.
This article is available at: russian, bulgarian, belarusian, ukrainian, serbian, croatian, romanian, polish, slovak, hungarian
This article was reviewed by: Arseny Pavlov
Share with friends:
◀ Previous
Pajero 1 and 2: Automatic gearbox
Next ▶

Automatic transmission design
Locking switch — removal and installation
Adjusting the locking switch
Checking the transmission control cable adjustment
Transmission Control Mechanism — Removal and Installation
Transmission housing tailstock seal
Similar materials for other Mitsubishi models

➤ Automatic Transmission — Checking Oil Level Mitsubishi Colt 4 and 5 (1991-2003)
➤ Automatic Transmission: Checking the Oil Level Mitsubishi Lancer 3 and 5 (1984-1992)
➤ Peculiarities of driving a car with automatic transmission Mitsubishi Galant 6 and 7 (1987-1998)
➤ Checking the fluid level in the automatic transmission Mitsubishi L200 4 (2005-2014, diesel)
➤ Four-speed automatic transmission INVECS-II Sport Mode Mitsubishi Outlander 1 (2003-2008)
➤ Automatic transmission Mitsubishi Carisma (1995-2004)
Link in different formats to this article
Comments and feedback from visitors
No comments yet


Add up two numbers 12 + 12


Pajero 4 (2006-2021) 
  • General information
  • User manual
  • Troubleshooting
  • Maintenance
  • Technical specifications
  • Power unit
  • Engine repair
  • Cooling system
  • Lubrication system
  • Fuel system
  • Engine management system
  • Intake and exhaust system
  • Engine electrical equipment
  • Transmission
  • Clutch
  • Manual gearbox
  • Automatic gearbox
  • Drive shafts
  • Chassis and running gear
  • Front suspension
  • Rear suspension
  • Brake system
  • Steering
  • Body and interior
  • Exterior (external elements)
  • Interior (internal elements)
  • Doors, locks and windows
  • Body dimensions
  • Electrical equipment
  • Safety system (SRS)
  • Air conditioner
  • Equipment and devices
  • Electrical diagrams
Pajero 1 and 2 (1982-1999) 
  • General information
  • User manual
  • Seats and seat belts
  • Instruments and controls
  • Driving and operation
  • Maintenance
  • Power unit
  • Gasoline engines
  • Diesel engines
  • Ignition system
  • Engine electrical equipment
  • Cooling and lubrication system
  • Power and exhaust system
  • Fuel system (gasoline)
  • Fuel system (diesel)
  • Transmission
  • Clutch
  • Mechanical gearbox
  • Automatic gearbox
  • Drive shafts and axles
  • Chassis and running gear
  • Front suspension
  • Rear suspension
  • Steering
  • Brake system
  • Body and interior
  • Exterior (external elements)
  • Interior (internal elements)
  • Doors, locks and windows
  • Electrical equipment
  • Equipment and devices
  • Heater and air conditioner
  • Cruise control
  • Headlights and lighting
  • Electrical circuits
MitsubishiMan.ru © 2018–2026 • Mobile version • Articles about Mitsubishi • Contacts • Sitemap: EN BG BY UA RS HR RO PL SK HU • Site search • Bookmark
Colt 2 and 3 (1983-1993) · Colt 4 and 5 (1991-2003) · Colt 5 (1995-2003) · Lancer 3 and 5 (1984-1992) · Lancer 9 (2000-2007) · Galant 5 (1983-1989) · Galant 6 and 7 (1987-1998) · L200 4 (2005-2014) · Outlander 1 (2003-2008) · Pajero 1 and 2 (1982-1999) · Pajero 4 (2006-2021) · Carisma (1995-2004) · Space Star (1998-2005) ·
This resource sets cookies 🍪 to avoid bothering you with repeated data entry.