



Contents: Checking the level ⤓ Antifreeze ⤓ Replacing the coolant ⤓ Flushing the cooling system ⤓ Radiator flushing ⤓ Engine flush ⤓
Checking the level
1. The expansion tank, made of transparent plastic, is located in the engine compartment. The coolant level in this tank should be maintained between the two marks. The coolant level should be checked with the engine cold. The cooling system is a closed type, so the loss of coolant should usually be very small. A noticeable decrease in the coolant level may indicate a leak. In this case, contact an authorized Mitsubishi dealer as soon as possible to check and repair the cooling system.
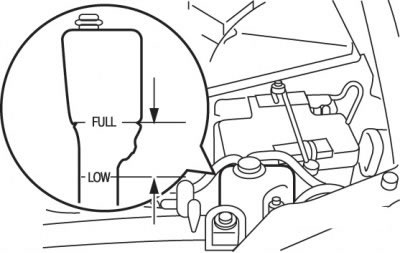
Fig. 2.8. Location of the expansion tank on cars with gasoline engines
2. If the coolant level in the expansion tank has dropped below the "LOW" mark, open the tank cap and add fluid (Fig. 2.8).
3. If there is no coolant in the expansion tank, also remove the radiator cap and add coolant to the filler neck level.
Warning! Do not unscrew the expansion tank or radiator cap on a hot engine. The cooling system is under pressure, and when removing the cap, hot liquid may splash out of the expansion tank, which can cause severe burns.
Antifreeze
The coolant contains ethylene glycol with an anti-corrosion additive. The cylinder head and water pump housing are made of aluminum alloy, to prevent their corrosion, it is necessary to periodically replace the coolant. Use only genuine Mitsubishi Genuine Coolant or equivalent. The liquid has excellent anti-corrosion properties, protects all metals, including aluminum, from corrosion and rust, and helps prevent deposits in the engine radiator, heater, cooling jacket of the cylinder head, cylinder block, etc. The coolant must contain anti-corrosion additives, so it cannot be replaced with plain water, even in summer. The required concentration of antifreeze in the coolant depends on the expected air temperature.
Attention! For efficient operation at low temperatures and to prevent corrosion, maintain the antifreeze concentration at 30–60%. Concentrations above 60% reduce the effectiveness of the antifreeze (increase in the crystallization start temperature) and impair its cooling capacity, which negatively affects engine operation.
Replacing the coolant
1. Drain the coolant from the radiator by first removing the radiator drain plug and then the radiator cap.
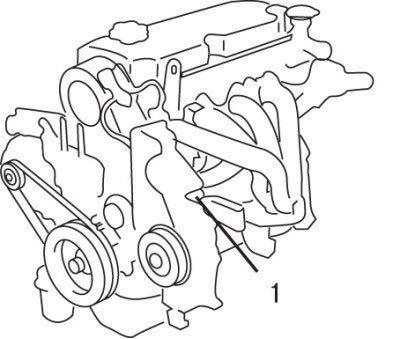
Fig. 2.9. Location of the engine drain plug (1)
2. Unscrew the drain plug of the cylinder block and drain the coolant from the engine (Fig. 2.9).
3. Remove the expansion tank and drain the coolant from it.
4. After draining the coolant, fill the radiator with clean water to flush the cooling system.
5. Apply 3M Nut Locking Part #4171 to the cylinder block drain plug threads and tighten to 39 N·m (25 ft·lbs).
6. Tighten the radiator drain plug securely.
7. Install the expansion tank.
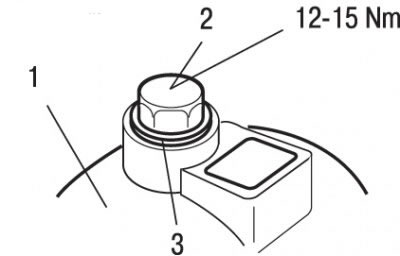
Fig. 2.10. Location of the air bleed screw: 1 – thermostat housing; 2 – air bleed screw; 3 – gasket
8. Remove the bleed screw from the cooling system and replace the sealing gasket (Fig. 2.10).
9. Pour coolant into the radiator until it starts to flow out of the cooling system bleed bolt hole, then tighten the bolt.
10. Slowly pour coolant into the radiator until it is completely full (to the lower edge of the filler neck), fill the expansion tank to the "FULL" mark.
11. Tighten the radiator cap tightly.
12. Start the engine and warm it up until the thermostat opens. To check, touch the radiator hose with your hand – it should be warm when the thermostat is open.
13. After the thermostat opens, press the accelerator pedal several times and then stop the engine.
14. Let the engine cool down and add coolant to the expansion tank up to the "FULL" mark.
Flushing the cooling system
The coolant must be changed periodically and the cooling system flushed, as rust and dirt form in the system channels.
The radiator must be flushed independently of the engine.
Radiator flushing
1. Disconnect the hoses from the radiator.
2. Insert the hose into the inlet of the upper radiator tank, turn on the water and flush the radiator until clean water appears from the lower radiator tank.
3. If you cannot flush the radiator with clean water, use a detergent.
Engine flush
1. Remove the thermostat and temporarily install its cover.
2. Disconnect the hoses from the radiator, feed a stream of clean water through the hose into the engine cylinder block through the upper radiator hose and flush it until clean water appears from the lower hose leading to the radiator.
3. Install the thermostat and connect the cooling system hoses.