



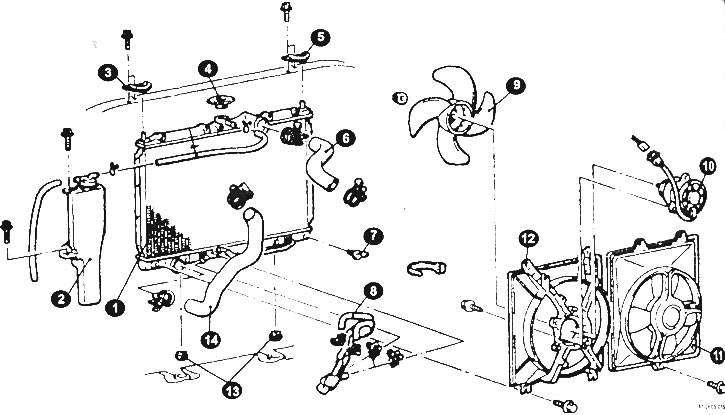
Radiator mounting elements
1 - radiator; 2 - expansion tank; 3, 5 - upper radiator support; 4 - radiator cap; 6 - Upper radiator hose; 7 - drain plug; 8 - Automatic transmission cooler hose; 9 - radiator fan; 10 - Radiator fan electric motor; 11 - Condenser fan (models with air conditioning); 12 - radiator fan shroud; 13 - lower radiator support; 14 - lower radiator hose.
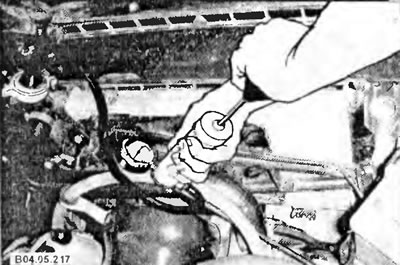
The only reason to remove the radiator is to replace it with a new one or to repair a leak. If the radiator requires constant topping up of fluid and the leak cannot be found in either the hoses or the radiator, the radiator cap may be the culprit. However, if the cap was faulty and you have replaced it, continue to monitor the fluid level. The system is pressurized again and leaks can occur quite suddenly, so it is necessary to periodically test the system under pressure. The picture shows one method of testing.
If the radiator cap is in good condition and the coolant is still decreasing, without any visible leaks from the outside, the problem is really serious. It may be caused by a defective cylinder head gasket. At this stage, you should consult a specialist.
If the radiator is leaking, replace it with a new or reconditioned one. If the radiator has been repaired by the owner or in a workshop, it should be pressure tested to at least 1.4 kg/cm². To do this, close the outlet channel with a suitable plug and supply compressed air to the radiator through another channel at a pressure of 1.4 kg/cm². Immerse the radiator in a bath of water at a temperature of 90°C. Leave it for 15 minutes and apply a pressure of 1.4 kg/cm² again. Watch for bubbles indicating leaks. If the radiator has not been pressure tested after repair, it should be monitored very carefully for several weeks after installation to detect possible leaks in time.
Removal
Drain the coolant as described above.
Loosen the upper radiator hose and lower radiator hose clamps and remove them.
Disconnect the hose from the expansion tank.
Disconnect all electrical wires from the radiator fan and fan switch.
Disconnect any cooling system lines that prevent the radiator from being removed from the vehicle.
After unscrewing the upper mounting bolts, remove the radiator together with the radiator fan (not all models).
Remove the radiator from the engine compartment, first removing it from the lower radiator mounting supports.
Flushing
Flush the radiator If the radiator is removed from the car, flush it in the opposite direction as well. Flush the radiator from the outside with a hose and a strong stream of water. If you suspect that the radiator is partially clogged, flush it with a chemical solution before removing it from the car. If nothing has changed, check whether water flows through the radiator normally. 20-25 liters should flow in half a minute.
Leaks can be temporarily eliminated by using special additives to the coolant or by covering part of the radiator with a special mastic. However, it is better to replace the radiator.
Installation
The radiator is installed in the reverse order.
Check the hoses for cracks and replace them if necessary.
[Article reprinted from the website: MITSUBISHIMAN.ru]