



Contents: Removal ⤓ Installation ⤓
Removal
1. Disconnect the battery cables, remove the battery and oil pan. On fuel injected models, remove the air cleaner assembly.
2. Raise the vehicle and place it on stable stands.
3. Drain the working fluid from the gearbox (see Chapter 1).
4. Remove the torque converter cover.
5. Use white paint to mark the alignment marks on the torque converter and drive plate so that they can be re-installed in their original positions during assembly.
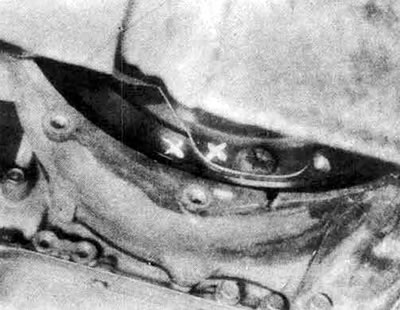
8.5 Mark the relative position of the drive disk and torque converter with white paint to accurately restore it during assembly
6. Remove the three bolts securing the torque converter to the drive plate. To access these bolts, rotate the crankshaft one at a time.
7. Remove the starter (see Chapter 5).
8. Disconnect the drive shafts from the gearbox (see Chapter 8).
9. Disconnect the speedometer cable.
10. Disconnect the wiring harness from the gearbox.
11. Disconnect the vacuum hoses from the transmission on applicable models.
12. Remove the exhaust system components that prevent the gearbox from being removed (see Chapter 4).
13. Disconnect the throttle control cable.
14. Disconnect the gear shift linkage from the gearbox.
15. Suspend the engine on a winch or support it with a jack using a wooden block.
16. Support the gearbox with a jack; it is preferable to use a special jack designed for this purpose. Safety chains will help to secure the gearbox to the jack.
17. Remove the chassis and suspension components that prevent removal of the gearbox.
18. Unscrew the bolts securing the gearbox to the engine.
19. Unscrew the gearbox mounting bolts and nuts.
20. Slowly lower the gearbox, disconnect and plug the transmission cooling system pipes.
21. Move the transmission rearward to disengage from the engine block pins and ensure that the torque converter is disengaged from the drive plate. Secure the torque converter to the transmission to prevent it from falling out during removal. Lower the transmission.
Installation
22. Before installation, make sure that the torque converter hub is securely fixed in the pump.
23. With the transmission secured to the jack, lift it into place. Keep it level while lifting to prevent the torque converter from falling forward. Reconnect the coolant lines.
24. Rotate the torque converter until the bolt holes align with the drive disk holes. The paint marks made in step 5 on the torque converter and drive disk must be aligned.
25. Move the gearbox forward until the pins and torque converter engage.
(The source of the article is available at: «MitsubishiMan.ru»)
26. Replace the transmission housing to engine mounting bolts and nuts. Tighten the bolts and nuts to the specified torque. Install the transmission fasteners.
27. Install the torque converter mounting bolts to the drive disc. Tighten the bolts to the specified torque.
28. Reinstall the gearbox and all chassis and suspension components that were removed earlier. Tighten the bolts and nuts to the required torque.
29. Remove the jacks supporting the gearbox and engine.
30. Reinstall the starter, (see Chapter 5).
31. Connect the vacuum hoses (if used).
32. Connect the gearshift and throttle control rods.
33. Connect the gearbox electrical connectors.
34. Reinstall the torque converter cover.
35. Connect the drive shafts.
36. Connect the speedometer cable.
37. Adjust the gear shift mechanism (see section 5).
38. Reinstall the exhaust system components that were removed earlier.
39. Lower the car.
40. Fill the gearbox with working fluid (see Chapter 1), start the engine and check for leaks.