



Contents: Checking hydraulic valve clearance…⤓ Removal air from hydraulic…⤓ Replacing hydraulic compensators ⤓
Attention! Sometimes after starting the engine or even during its operation, you can hear a characteristic persistent sound (clacking), which can be mistaken for the sound of the hydraulic compensator. In this case, you must do the following.
1. Check the engine oil level in the engine oil pan, top up or replace the oil if necessary.
If the amount of oil is insufficient, the oil intake can trap air, which mixes with the oil in the oil passages.
If there is too much oil, the counterweights stir up the oil in the pan, forming an oil-air emulsion.
Oil and air cannot easily separate in old oil, so the amount of air in the oil increases. If such a mixture gets into the high-pressure chamber of the hydraulic compensator, the air is compressed when the pressure is applied to the hydraulic compensator when the valve opens, and the hydraulic compensator is also compressed, causing a sound when the valve closes. This phenomenon also occurs when the clearances in the valve drive are too large.
The operation of the hydraulic lifters is restored when the air separates from the oil.
2. Start the engine and slowly accelerate it several times (about 10). If the sound disappears, it means that the oil has been freed from air and the normal operation of the hydraulic compensators has been restored.
3. Gradually increase the engine crankshaft speed from idle speed to approximately 3000 min⁻¹ (for 30 seconds), and then gradually reduce the engine crankshaft speed to idle speed (also for 30 seconds).
Caution! If the car has been parked on a slope for a long time, oil may leak out of the hydraulic compensator, and air will enter the high-pressure chamber instead.
Warning! If the car has been standing still for a long time, oil may leak out of the oil channels. In this case, air can sometimes get into the high-pressure chamber of the hydraulic compensators.
4. If, however, after performing the above operations the sound does not disappear, check the condition of the hydraulic lifters:.
- turn off the engine;
- set the piston of the 1st cylinder to TDC in the compression stroke;
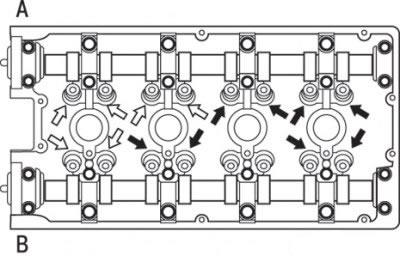
Fig. 3.7. When setting the piston of the 1st cylinder to TDC, check the operation of the hydraulic compensators indicated by white arrows, and after setting the piston of the 4th cylinder to TDC, check the operation of the hydraulic compensators indicated by black arrows: A - intake valve side; B – exhaust valve side
- press the valve rocker arm in the area marked with white arrows (Fig. 3.7) to check the position of the valve rocker arm;
- slowly rotate the crankshaft 360° clockwise;
- press the valve rocker arm in the area marked with black arrows (see Fig. 3.7) to check the position of the valve rocker arm;
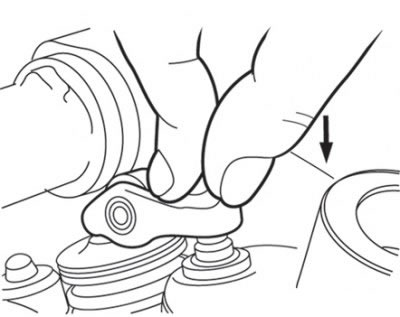
Fig. 3.8. Pressing the valve rocker when the cam profile is in the closed valve position
- if the valve rocker easily drops when pressed, when the cam profile is in the closed valve position, as shown in Fig. 3.8, the hydraulic compensator is faulty and requires replacement. When replacing hydraulic compensators, remove air from them and check their condition again;
Attention! It is necessary to check the hydraulic compensator for leaks in order to accurately determine whether it is working properly or not.
- finally, if the valve rocker arms are not pressed through when checked, the hydraulic compensator is in good working order. Check all other hydraulic compensators in the same way.
Checking hydraulic valve clearance compensators
1. If after starting the engine, as the engine warms up, extraneous noise (knocking) from the hydraulic compensators appears and does not disappear, carry out the following check:
- extraneous noise caused by a faulty hydraulic compensator appears immediately after the engine is started and changes in accordance with the engine crankshaft speed. This noise does not depend on the actual engine load. Therefore, if the noise does not appear immediately after the engine is started and does not change in accordance with the engine crankshaft speed or changes in accordance with the engine load, then the hydraulic compensators are not the cause of the noise;
- when the hydraulic compensators malfunction, the noise almost never disappears, even when the engine is idling after warming up. The only case when the noise can disappear is when the consequences of insufficient oil maintenance in the engine are eliminated, and the knocking of the hydraulic compensators in this case is caused by contamination of the engine oil.
2. Start the engine.
3. Make sure that the noise appears immediately after starting the engine and changes in accordance with the change in engine crankshaft speed.
4. If the noise does not appear immediately after starting the engine or does not change with changes in engine speed, the malfunction is not caused by a malfunction of the hydraulic compensators - look for another cause of the malfunction. Moreover, if the noise does not change due to changes in engine speed, the cause of the malfunction is probably not in the engine (in these cases, the hydraulic compensators are working normally.)
5. When the engine is idling, make sure that the noise level does not change when the engine load changes (for example, when the selector is switched from position "N" to position "D"). If the noise level changes, the cause may be impact of parts due to wear of the crankshaft bearings or connecting rod bearing shells (in such cases, the hydraulic compensators operate normally).
6. After warming up the engine, let it idle and check for any extraneous noise. If the noise has decreased or disappeared, the knocking of the hydraulic lifters may be caused by contaminated engine oil. Clean the hydraulic lifters.
7. Remove air from the hydraulic lifters.
8. If the noise does not disappear even after removing the air, clean the hydraulic lifters.
Removal air from hydraulic compensators
Caution! If the vehicle has been parked on a slope for a long period of time, the amount of oil in the hydraulic compensators will decrease and when the engine is started, air may enter the above-plunger cavity of the hydraulic compensator.
After the car has been parked for a long time, the oil drains from the oil channel, the supply of oil to the hydraulic compensators takes a certain amount of time, and air can get into the above-plunger cavity of the hydraulic compensator.
If any of the above situations occur, extraneous noise can be eliminated by removing air from the hydraulic lifters.
1. Check the condition of the engine oil and top up or replace it if necessary.
Caution! If the oil level is insufficient, air will be sucked in through the oil intake with a mesh and enter the oil channel.
The original article is on the website (www.mitsubishiman.ru)
If the oil level is higher than required, the oil will be mixed with air by the crankshaft, resulting in a lot of air in it.
2. Oil and air cannot be easily separated in old oil, so the amount of air in the oil increases.
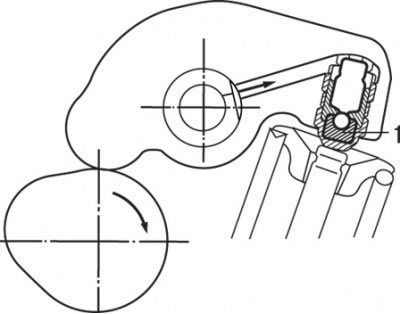
Fig. 3.9. Location of the plunger cavity (1) in the hydraulic compensator
3. If air mixed with oil due to one of the above reasons gets into the above-plunger cavity of the hydraulic compensator, the air inside the above-plunger cavity will be compressed when the valve opens and the hydraulic compensator will not be compressed enough, which will lead to the appearance of extraneous noise when the valve closes (Fig. 3.9). This produces the same effect as in the case of an erroneous setting of too large a clearance in the valve mechanism. If the air from the oil disappears, the operation of the hydraulic compensators returns to normal.
4. To warm up the engine, let it idle for 1–3 minutes.
5. Under no-load conditions, increase the engine speed to 3000 min - 1 for 15 seconds, then reduce the speed to idle speed and let the engine idle for 15 seconds, then repeat the cycle and check whether the abnormal noise disappears. Under normal operation, the noise disappears after 10 to 30 cycles. If the noise level has not changed after 30 cycles or more, the noise is not caused by air inside the hydraulic lifters.
6. After the noise disappears, repeat the cycle 5 more times.
7. Let the engine idle for 1-3 minutes and check that the noise has disappeared.
Replacing hydraulic compensators
Caution! To prevent the valves from hitting the pistons when replacing the hydraulic compensators, it is necessary to turn the crankshaft so that the pistons are below TDC. In some positions, the valve rocker arms are raised by the camshaft cams, so the hydraulic compensators cannot be removed. In these cases, the crankshaft must be positioned so that the valve rocker arms remain unlifted.
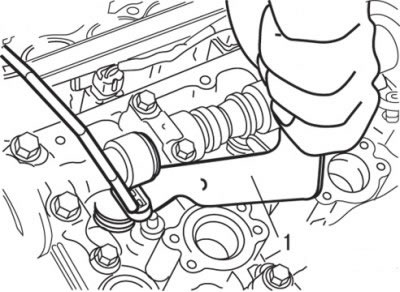
Fig. 3.10. Using special tool MD998782 to move the valve down to remove the roller tappet valve rocker arm
8. Using a special tool, press the valve down and remove the valve rocker arm with the roller tappet (Fig. 3.10).
9. Remove the hydraulic compensator from the cylinder head.
10. Install a new hydraulic compensator with air bled from it.
11. Using the same special tool, press the valve down and install the valve rocker arm with roller tappet.
Attention! When installing a roller valve rocker arm, first install its shoulder on the upper part of the hydraulic compensator, then, pressing the valve down, move the rest of the rocker arm onto the upper end of the valve stem.