



Description
- A turbocharger increases engine power by increasing the pressure in the intake manifold above atmospheric pressure.
- The turbocharger is driven by exhaust gases. The exhaust gases, passing through the turbocharger, accelerate the turbine to a high rotation frequency, which is located on the shaft, at the other end of which the compressor is installed. The compressor, rotating in its own casing, compresses the air on the way to the intake manifold.
- Boost air pressure (intake manifold pressure) is limited by a valve that deflects exhaust gases away from the turbine wheel in response to a pressure-sensitive actuator.
- The turbine shaft is lubricated with engine oil supplied through a pipe from the main oil channel of the engine.
Precautionary measures
- The turbocharger operates at extremely high speeds and temperatures, so certain precautions must be taken to avoid premature failure.
- Do not operate the turbocharger with any part or hose removed. Foreign particles that get into the rotating blades can damage the turbocharger.
- Do not increase the engine speed immediately after starting, especially on a cold engine. It is necessary to wait at least a few seconds to ensure normal oil circulation.
- Let the engine idle before turning it off. If you turn the engine off immediately after closing the throttle, the turbocharger turbine will spin without lubrication.
- Allow the engine to idle for several minutes before turning it off after running the engine at high RPM.
- Strictly adhere to the recommended oil and oil filter change intervals. Use only the recommended quality oil for engine lubrication. Using low-grade engine oil may cause carbon deposits on the turbine shaft and turbocharger failure.
[Original version of the article on the website: mitsubishiman.ru]
Removal
Note: To make it easier to loosen the nuts that secure the turbocharger to the exhaust manifold, it is recommended to spray hot grease on the nuts immediately before removing the turbocharger.
- Remove the air intake manifold.
- Loosen the clamp and disconnect the air hose from the turbocharger (Fig. 4.41).
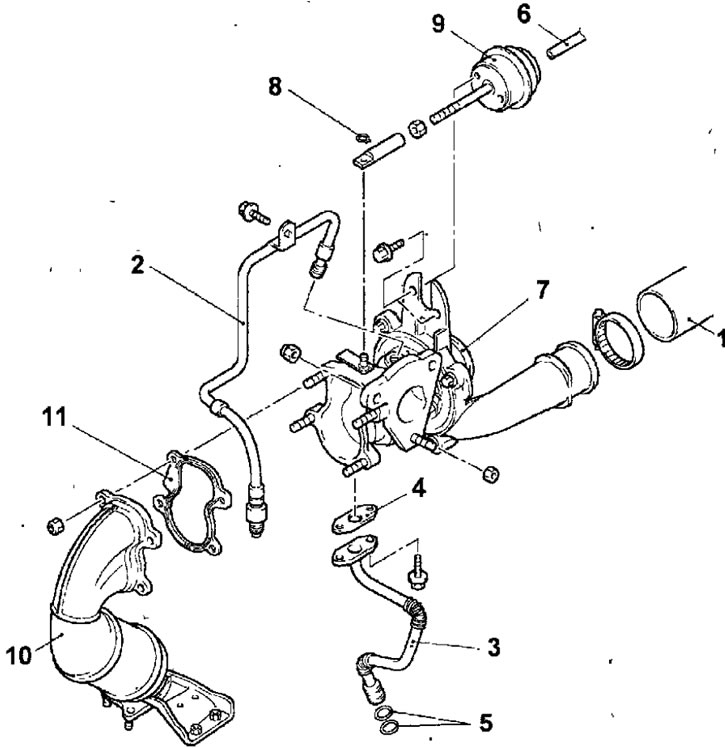
Rice. 4.41. Turbocharger: 1 - air hose; 2 - engine oil supply pipe; 3 - engine oil return pipe; 4 - Engine oil return pipe gasket; 5 - sealing ring; 6- vacuum hose; 7 - turbocharger; 8 - retaining ring; 9 - damper control drive; 10 - outlet pipe; 11 - gasket
- Unscrew the bolt securing the oil supply pipe. Unscrew the connecting nuts and remove the oil supply pipe.
- Remove the two bolts and the oil return pipe and gasket. Remove the O-rings from the bottom of the oil return pipe.
- Disconnect the vacuum hose from the turbocharger flap actuator solenoid valve.
- Loosen the nuts and remove the turbocharger together with the outlet pipe.
- Remove the retaining ring and disconnect the turbocharger flap actuator solenoid valve stem from the turbocharger.
- Remove the two bolts and the turbocharger flap actuator solenoid valve from the turbocharger.
- Remove the bolts and the exhaust manifold and gasket from the turbocharger
Examination
- Check the internal surface, bypass bolt and mating surface of the oil supply pipe for contamination and clean if necessary.
- If there is carbon deposits in the turbocharger oil passage, clean them and blow out the passage with compressed air. Do not allow foreign particles to enter the turbocharger.
- Check the turbine wheel and turbocharger impeller for cracks or damage.
- Check the ease of rotation (by hand) of the turbine and pump wheels.
- Check the turbocharger for oil leaks.
- Check the oil supply and return lines for blockages, kinks, or other damage.
Installation
- Installation is carried out in the reverse order of removal, taking into account the following.
- Add fresh engine oil through the turbocharger feed hole.
- Before starting the engine, disconnect the connector from the pressure regulator to the high-pressure fuel pump.
- Turn on the starter for a few seconds until the oil pressure indicator light goes out.
- Connect the regulator connector, turn on the preheater and start the engine.
- Let the engine idle and check for oil leaks from the turbocharger oil line fittings.