
English Русский
Български
Беларускі
Український
Српски
Hrvatski
Română
Polski
Slovenský
Magyar
Articles Bookmark Contacts Sitemap   
Company Audi Company Ford Company Hyundai Company Kia Company Mazda Company Mercedes-Benz Company Nissan
MitsubishiMan.ru


Home Colt Lancer Galant L200 Outlander Pajero Others
Colt 5 (1995-2003, petrol) Colt 4 and 5 (1991-2003) Colt 2 and 3 (1983-1993)

Rear Disc Brake Pads — Removal and Installation (Mitsubishi Colt 4)

  • Home
  • Colt
  • 4 (1991-2003)
  • Chassis and running gear
  • Brake system
  • Rear Disc Brake Pads — Removal and Installation
0
Contents: Removal ⤓ Installation ⤓

Removal


Mark the position of the wheel rim on the wheel hub with paint.

Place the rear of the car on jack stands.

Remove the wheels.

After unscrewing the pin (1), lift the brake caliper up, attach it to the car with wire without pulling the brake hose.
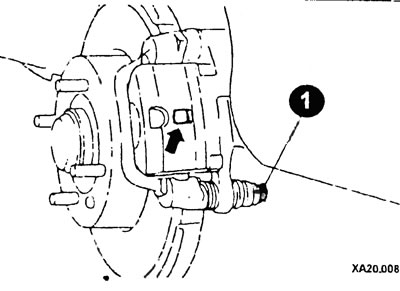


Do not remove grease from your finger.

Remove the brake pads with spacer springs, spacer washers and anti-squeal linings.

Installation


CAUTION: Do not press the brake pedal when the brake pads are removed.


Clean the guide surfaces and the pad seats with a soft metal brush or wash with a cloth soaked in alcohol. Do not use any solvents or tools with sharp edges.

If there are grooves and scratches more than 0.5 mm deep on the brake disc, replace the disc.

Measure the thickness of the brake disc.

Check the dust boot and seals in the caliper. Replace a defective dust boot immediately by removing and disassembling the caliper.

Carefully screw the brake piston clockwise until it stops in the brake caliper using a special tool. The caliper does not need to be removed.
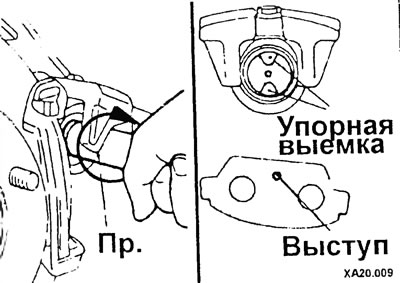


The brake piston should not just be pressed in, but twisted.


To turn the piston, a special tool is inserted into the stop recesses. When turning the piston, observe the brake fluid level in the reservoir.

After replacing the pads, the brake fluid level in the reservoir should not be above the MAX mark.

Measure the moment of starting of the wheel hub. Screw on the wheel nuts to secure the brake disc to the wheel hub.
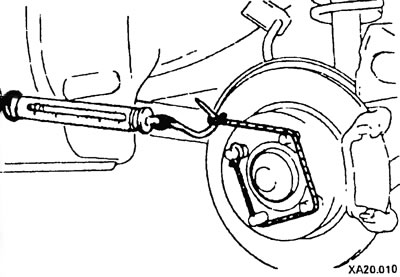


Treat the reverse sides of the brake pads and anti-squeak linings with a thin layer of grease. The grease should not get on the working surface of the brake pad and on the brake disc.

Insert both brake pads with new anti-squeal linings into the retaining springs in the caliper bracket.

Turn the piston body downwards, insert and secure the pin.

With the engine running, press and hold the brake pedal for about 5 seconds. The brake pads will take the working position. With the engine off, rotate the wheel hub forward 10 revolutions. Then measure the wheel hub breakaway torque and compare it with the breakaway torque measured with the old brake pads. If the difference is higher than the required value, the brake caliper must be disassembled and repaired. The required value is 70 N or less.


Place the wheels, taking into account the previously made marks, screw in the wheel nuts. Lower the car and tighten the nuts crosswise.

With the engine running, press the brake pedal hard several times until strong resistance appears. Check and, if necessary, adjust the handbrake lever stroke.

The fluid level in the tank should be at the MAX mark.

Adjust the handbrake.

Run in the new brake pads. To do this, brake the car several times at a speed of 80 km/h to 40 km/h. Let the brakes cool down between braking.
This article is available at: russian, bulgarian, belarusian, ukrainian, serbian, croatian, romanian, polish, slovak, hungarian
This article was reviewed by: Nikita Romanov
Share with friends:
◀ Previous
Colt 4 and 5: Brake system
Next ▶

Rear Disc Brake Caliper Components
Front Disc Brake Caliper — Disassembly and Assembly
Removal the front brake disc
Checking the thickness and lateral runout of the front brake disc
Replacing the front brake pads
Rear Brake Caliper — Removal and Installation
Rear Disc Brake Caliper — Disassembly and Assembly
Rear drum brakes — device
Rear wheel drum brake shoes — removal and installation
Drum brake working cylinders — removal and installation
Similar materials for other Mitsubishi models

➤ Removal and installation rear disc brake pads Mitsubishi Lancer 3 and 5 (1984-1992)
➤ Disc brake pads (front and rear) — replacement Mitsubishi Galant 5 (1983-1989, petrol)
➤ Checking the thickness of the rear drum brake shoes and… Mitsubishi L200 4 (2005-2014, diesel)
➤ Disassembling and assembling the rear drum brake Mitsubishi Outlander 1 (2003-2008)
➤ Replacing rear disc brake pads Mitsubishi Pajero 1 and 2 (1982-1999)
➤ Checking and replacing front disc brake pads Mitsubishi Carisma (1995-2004)
Link in different formats to this article
Comments and feedback from visitors
No comments yet


Add up two numbers 18 + 27


Colt 5 (1995-2003, petrol) 
  • General information
  • User manual
  • Specifications
  • Gasoline engines
  • 4G1 engines until 1995
  • 4G1 engines since 1995
  • Repair of 4G9 engines
  • Cooling system
  • Reduced exhaust gas toxicity
  • Engine electrical equipment
  • Injection system MPI
  • Carburetors
  • Transmission
  • Clutch and drive shafts
  • Manual gearbox F4M21/F5M21
  • Manual gearbox F4M41
  • Automatic gearbox F4A21
  • Automatic gearbox F4A41
  • Chassis and running gear
  • Car suspension
  • Steering
  • Brake system
  • Body
  • Exterior (external elements)
  • Electrical equipment
  • Equipment and devices
  • Electrical circuits
Colt 4 and 5 (1991-2003) 
  • General information
  • Maintenance
  • Power unit
  • Engine in a car
  • Engine repair (gasoline)
  • Engine repair (diesel)
  • Lubrication system
  • Cooling system
  • Carburetor
  • Fuel injection MPI
  • Fuel injection GDI
  • Emission reduction
  • Fuel system (diesel)
  • Ignition system
  • Exhaust system
  • Transmission
  • Clutch
  • Manual gearbox
  • Automatic gearbox
  • Drive shafts
  • Chassis and running gear
  • Chassis malfunctions
  • Front suspension
  • Rear suspension
  • Steering
  • Wheels and tires
  • Brake system
  • Body and interior
  • Body elements
  • Electrical equipment
  • Equipment and devices
  • Power devices
  • Heating and air conditioning
  • Electrical circuits
Colt 2 and 3 (1983-1993) 
  • General information
  • User manual
  • Daily care
  • Maintenance
  • Power unit
  • Engine in a car
  • Engine overhaul
  • Cooling system
  • Heater and air conditioner
  • Power and exhaust system
  • Engine electrical equipment
  • Emission reduction
  • Transmission
  • Mechanical gearbox
  • Automatic gearbox
  • Clutch and axles
  • Chassis and running gear
  • Brake system
  • Car suspension
  • Steering
  • Body and interior
  • Body and elements repair
  • Electrical equipment
  • Equipment and devices
  • Electrical circuits
MitsubishiMan.ru © 2018–2026 • Mobile version • Articles about Mitsubishi • Contacts • Sitemap: EN BG BY UA RS HR RO PL SK HU • Site search • Bookmark
Colt 2 and 3 (1983-1993) · Colt 4 and 5 (1991-2003) · Colt 5 (1995-2003) · Lancer 3 and 5 (1984-1992) · Lancer 9 (2000-2007) · Galant 5 (1983-1989) · Galant 6 and 7 (1987-1998) · L200 4 (2005-2014) · Outlander 1 (2003-2008) · Pajero 1 and 2 (1982-1999) · Pajero 4 (2006-2021) · Carisma (1995-2004) · Space Star (1998-2005) ·
This resource sets cookies 🍪 to avoid bothering you with repeated data entry.