
English Русский
Български
Беларускі
Український
Српски
Hrvatski
Română
Polski
Slovenský
Magyar
Articles Bookmark Contacts Sitemap   
Company Audi Company Ford Company Hyundai Company Kia Company Mazda Company Mercedes-Benz Company Nissan
MitsubishiMan.ru


Home Colt Lancer Galant L200 Outlander Pajero Others
Colt 5 (1995-2003, petrol) Colt 4 and 5 (1991-2003) Colt 2 and 3 (1983-1993)

Crankshaft — Check (Mitsubishi Colt 4)

  • Home
  • Colt
  • 4 (1991-2003)
  • Power unit
  • Engine repair (gasoline)
  • Crankshaft — Check
0
Clean the crankshaft with solvent and dry it. Clean the oil holes with a stiff brush and wash them with solvent.

Check the main and connecting rod journals for signs of wear, scratches, pits and cracks.

Rub a copper plate several times on each journal. If traces of copper remain on the journal, it is too rough and needs to be re-sanded.

Remove any burrs from the oil hole on the shaft using a scraper or file.

Check the shaft for cracks and other damage. Use a flaw detector in the workshop to check for hidden cracks.

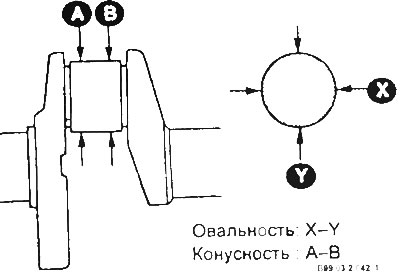
Using a micrometer, measure the diameter of the main and connecting rod journals of the shaft, compare the results with the technical data. By measuring the diameter at several points around the circumference, you can determine whether there is ovality. By measuring the diameter at different ends of the journal, you can determine its taper.


Measure the crankshaft runout by mounting the shaft on prisms.
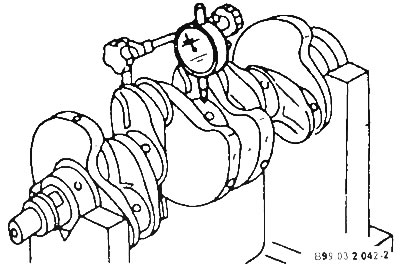


ATTENTION: The value of the runout is taken as the difference in indicator readings for one complete revolution.


If the crankshaft journals are damaged, worn, have an ovality or taper greater than the permissible limits, the shaft should be reground in a workshop. In this case, bearing liners of a repair size should be used.

Check the journals of the oil seals at both ends of the crankshaft for signs of wear or damage. If the oil seal has formed a groove on the journal, the new seal may leak. In some cases, the journal can be repaired by pressing a thin bushing into the groove. If repair is not possible, the crankshaft must be replaced.

[The text of the article was obtained from the website: MitsubishiMan]

Check the connecting rod and main bearing shells.
This article is available at: russian, bulgarian, belarusian, ukrainian, serbian, croatian, romanian, polish, slovak, hungarian
This article was reviewed by: Nikita Romanov
Share with friends:
◀ Previous
Colt 4 and 5: Engine repair (gasoline)
Next ▶

Pistons and connecting rods — check
Cylinders — Check
Cylinder Block — Cleaning and Checking
Crankshaft — Removal
Pistons and connecting rods — removal
Main and connecting rod bearings — inspection
General instructions for engine assembly
Crankshaft — installation
Connecting rod and piston group — assembly
Piston Rings — Inspection and Assembly Recommendations
Similar materials for other Mitsubishi models

➤ Crankshaft Position Sensor — Check Mitsubishi Lancer 3 and 5 (1984-1992)
➤ Crankshaft — check Mitsubishi Galant 5 (1983-1989, petrol)
➤ Installing the crankshaft seals and front upper cover Mitsubishi L200 4 (2005-2014, diesel)
➤ Removal and installation front and rear crankshaft oil… Mitsubishi Outlander 1 (2003-2008)
➤ Wheels and tires — check and rotation Mitsubishi Pajero 1 and 2 (1982-1999)
➤ Checking the engine crankshaft speed at idle speed Mitsubishi Carisma (1995-2004)
Link in different formats to this article
Comments and feedback from visitors
No comments yet


Add up two numbers 27 + 39


Colt 5 (1995-2003, petrol) 
  • General information
  • User manual
  • Specifications
  • Gasoline engines
  • 4G1 engines until 1995
  • 4G1 engines since 1995
  • Repair of 4G9 engines
  • Cooling system
  • Reduced exhaust gas toxicity
  • Engine electrical equipment
  • Injection system MPI
  • Carburetors
  • Transmission
  • Clutch and drive shafts
  • Manual gearbox F4M21/F5M21
  • Manual gearbox F4M41
  • Automatic gearbox F4A21
  • Automatic gearbox F4A41
  • Chassis and running gear
  • Car suspension
  • Steering
  • Brake system
  • Body
  • Exterior (external elements)
  • Electrical equipment
  • Equipment and devices
  • Electrical circuits
Colt 4 and 5 (1991-2003) 
  • General information
  • Maintenance
  • Power unit
  • Engine in a car
  • Engine repair (gasoline)
  • Engine repair (diesel)
  • Lubrication system
  • Cooling system
  • Carburetor
  • Fuel injection MPI
  • Fuel injection GDI
  • Emission reduction
  • Fuel system (diesel)
  • Ignition system
  • Exhaust system
  • Transmission
  • Clutch
  • Manual gearbox
  • Automatic gearbox
  • Drive shafts
  • Chassis and running gear
  • Chassis malfunctions
  • Front suspension
  • Rear suspension
  • Steering
  • Wheels and tires
  • Brake system
  • Body and interior
  • Body elements
  • Electrical equipment
  • Equipment and devices
  • Power devices
  • Heating and air conditioning
  • Electrical circuits
Colt 2 and 3 (1983-1993) 
  • General information
  • User manual
  • Daily care
  • Maintenance
  • Power unit
  • Engine in a car
  • Engine overhaul
  • Cooling system
  • Heater and air conditioner
  • Power and exhaust system
  • Engine electrical equipment
  • Emission reduction
  • Transmission
  • Mechanical gearbox
  • Automatic gearbox
  • Clutch and axles
  • Chassis and running gear
  • Brake system
  • Car suspension
  • Steering
  • Body and interior
  • Body and elements repair
  • Electrical equipment
  • Equipment and devices
  • Electrical circuits
MitsubishiMan.ru © 2018–2026 • Mobile version • Articles about Mitsubishi • Contacts • Sitemap: EN BG BY UA RS HR RO PL SK HU • Site search • Bookmark
Colt 2 and 3 (1983-1993) · Colt 4 and 5 (1991-2003) · Colt 5 (1995-2003) · Lancer 3 and 5 (1984-1992) · Lancer 9 (2000-2007) · Galant 5 (1983-1989) · Galant 6 and 7 (1987-1998) · L200 4 (2005-2014) · Outlander 1 (2003-2008) · Pajero 1 and 2 (1982-1999) · Pajero 4 (2006-2021) · Carisma (1995-2004) · Space Star (1998-2005) ·
This resource sets cookies 🍪 to avoid bothering you with repeated data entry.