
English Русский
Български
Беларускі
Український
Српски
Hrvatski
Română
Polski
Slovenský
Magyar
Articles Bookmark Contacts Sitemap   
Company Audi Company Ford Company Hyundai Company Kia Company Mazda Company Mercedes-Benz Company Nissan
MitsubishiMan.ru


Home Colt Lancer Galant L200 Outlander Pajero Others
Colt 5 (1995-2003, petrol) Colt 4 and 5 (1991-2003) Colt 2 and 3 (1983-1993)

Valve springs, fasteners and linings — replacement (Mitsubishi Colt 2)

  • Home
  • Colt
  • 2 (1983-1993)
  • Power unit
  • Engine in a car
  • Valve springs, fasteners and linings — replacement
0
Caution! Broken valve springs and damaged valve linings can be replaced without removing the cylinder head.


1. Remove the valve cover.

2. Unscrew the spark plug from the cylinder that has the damaged part. If you are replacing all the valve covers, you must unscrew all the spark plugs.

3. Turn the crankshaft so that the piston of the cylinder with the damaged part is at the top dead center. If you are replacing all the valve linings, start with the first cylinder and replace them one by one, according to the sequence of cylinder operation.
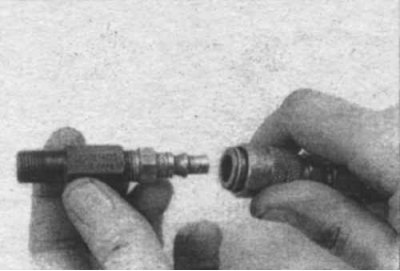


5.4 Adapter screwed into the spark plug hole


4. Screw the adapter into the spark plug hole (5.4) and connect the hose from the compressor to the adapter.
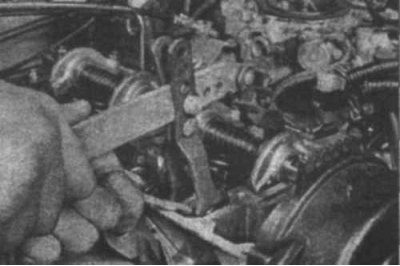


5.5 If you use the tool shown in the photo, it is not necessary to remove the intake valve rocker shaft


5. If you do not have a special lever tool (5.5), remove the rocker arm shaft.

6. Pump compressed air into the cylinder.

7. The valves should remain closed under air pressure. If the valve linings are in poor condition, air leakage will occur.

8. If you do not have a compressor, you can use an alternative method. Set the piston slightly below top dead center. Insert a nylon rope into the spark plug hole and push it in until it completely fills the combustion chamber. Turn the crankshaft until you feel slight resistance.
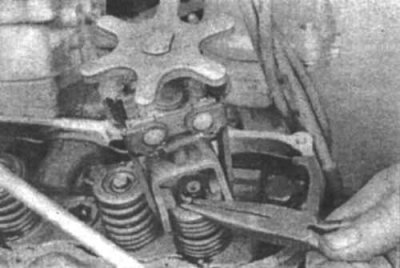


5.9 Remove the spring retainers using needle-nose pliers.


9. Plug the holes in the cylinder head with rags to prevent tools and parts from falling through. Compress the valve spring with a special tool. Remove the spring holders with pliers (5.9).
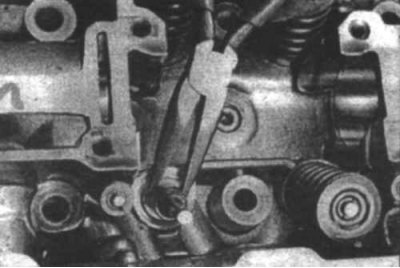


5.10 Remove the guide gasket with pliers.


10. Remove the spring support washer and the valve spring itself, then remove the guide gasket (5.10):

11. Wrap rubber or insulating tape around the valve to prevent it from falling into the combustion chamber. Release the air pressure.

12. Check if the valve surface is damaged. Rotate the valve in the guide bushing to check if it is bent.

13. Move the valve up and down to make sure it does not stick. If the valve sticks, it is either bent or damaged. The cylinder head will need to be removed to repair it.

14. Pump air into the cylinder again until the valve closes. Remove the tape from the valve.
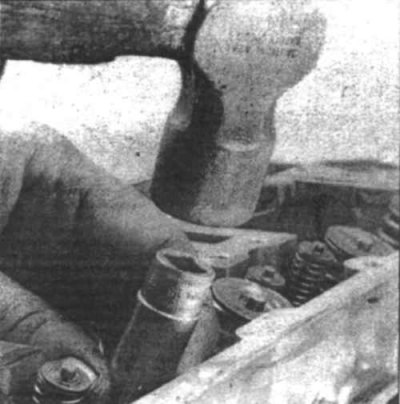


5.15 Install the gasket in place by driving it in using a bushing and a hammer.


15. Lubricate the valve with engine oil and insert a new guide gasket (5.15).

16. Install the valve spring.

17. Install the spring support washer. Compress the spring and carefully insert the holders into the groove. Apply a small amount of grease (5.15) to the inner surface of the holders.

18. Release the spring and make sure the holders are in place.
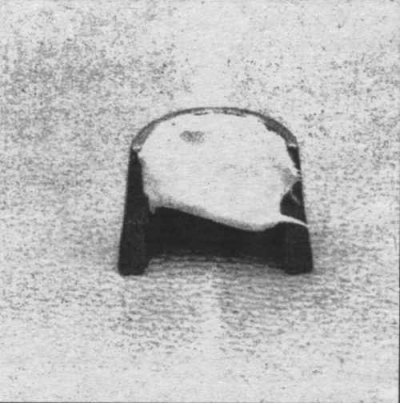


5.17 Apply a small amount of grease to the inside surface of the holders


19. Disconnect the compressor hose and unscrew the adapter from the spark plug hole. If you used a rope, remove it from the cylinder.

20. Install the rocker arm shafts and rocker arms.

21. Insert the spark plugs and connect the wires to them.

22. Install the valve cover.

23. Start the engine, check for leaks and unusual sounds from under the valve cover.
This article is available at: russian, bulgarian, belarusian, ukrainian, serbian, croatian, romanian, polish, slovak, hungarian
This article was reviewed by: Arseny Pavlov
Share with friends:
◀ Previous
Colt 2 and 3: Engine in a car
Next ▶

Rocker arms — removal, inspection and installation
Valve cover — removal and installation
Repair operations that can be carried out without removing the engine from the vehicle
General information and engine identification
Engine specifications
Hydraulic valve regulators — removal, inspection and installation
Timing Belt and Sprockets — Removal, Checking and Installation
Front Crankshaft Oil Seal — Replacement
Camshafts — Removal, Inspection and Installation
Intake manifold — removal and installation
Similar materials for other Mitsubishi models

➤ Checking the tire valve Mitsubishi Lancer 3 and 5 (1984-1992)
➤ Valve springs, holders and valve stem seals — replacement Mitsubishi Galant 5 (1983-1989, petrol)
➤ Adjusting valve clearances Mitsubishi L200 4 (2005-2014, diesel)
➤ Checking the opening pressure of the radiator cap valve Mitsubishi Outlander 1 (2003-2008)
➤ Crankcase ventilation valve (petrol engines) Mitsubishi Pajero 1 and 2 (1982-1999)
➤ Checking and adjusting valve clearances (SOHC) Mitsubishi Carisma (1995-2004)
Link in different formats to this article
Comments and feedback from visitors
No comments yet


Add up two numbers 18 + 27


Colt 5 (1995-2003, petrol) 
  • General information
  • User manual
  • Specifications
  • Gasoline engines
  • 4G1 engines until 1995
  • 4G1 engines since 1995
  • Repair of 4G9 engines
  • Cooling system
  • Reduced exhaust gas toxicity
  • Engine electrical equipment
  • Injection system MPI
  • Carburetors
  • Transmission
  • Clutch and drive shafts
  • Manual gearbox F4M21/F5M21
  • Manual gearbox F4M41
  • Automatic gearbox F4A21
  • Automatic gearbox F4A41
  • Chassis and running gear
  • Car suspension
  • Steering
  • Brake system
  • Body
  • Exterior (external elements)
  • Electrical equipment
  • Equipment and devices
  • Electrical circuits
Colt 4 and 5 (1991-2003) 
  • General information
  • Maintenance
  • Power unit
  • Engine in a car
  • Engine repair (gasoline)
  • Engine repair (diesel)
  • Lubrication system
  • Cooling system
  • Carburetor
  • Fuel injection MPI
  • Fuel injection GDI
  • Emission reduction
  • Fuel system (diesel)
  • Ignition system
  • Exhaust system
  • Transmission
  • Clutch
  • Manual gearbox
  • Automatic gearbox
  • Drive shafts
  • Chassis and running gear
  • Chassis malfunctions
  • Front suspension
  • Rear suspension
  • Steering
  • Wheels and tires
  • Brake system
  • Body and interior
  • Body elements
  • Electrical equipment
  • Equipment and devices
  • Power devices
  • Heating and air conditioning
  • Electrical circuits
Colt 2 and 3 (1983-1993) 
  • General information
  • User manual
  • Daily care
  • Maintenance
  • Power unit
  • Engine in a car
  • Engine overhaul
  • Cooling system
  • Heater and air conditioner
  • Power and exhaust system
  • Engine electrical equipment
  • Emission reduction
  • Transmission
  • Mechanical gearbox
  • Automatic gearbox
  • Clutch and axles
  • Chassis and running gear
  • Brake system
  • Car suspension
  • Steering
  • Body and interior
  • Body and elements repair
  • Electrical equipment
  • Equipment and devices
  • Electrical circuits
MitsubishiMan.ru © 2018–2026 • Mobile version • Articles about Mitsubishi • Contacts • Sitemap: EN BG BY UA RS HR RO PL SK HU • Site search • Bookmark
Colt 2 and 3 (1983-1993) · Colt 4 and 5 (1991-2003) · Colt 5 (1995-2003) · Lancer 3 and 5 (1984-1992) · Lancer 9 (2000-2007) · Galant 5 (1983-1989) · Galant 6 and 7 (1987-1998) · L200 4 (2005-2014) · Outlander 1 (2003-2008) · Pajero 1 and 2 (1982-1999) · Pajero 4 (2006-2021) · Carisma (1995-2004) · Space Star (1998-2005) ·
This resource sets cookies 🍪 to avoid bothering you with repeated data entry.