



Contents: Removal ⤓ Installation ⤓
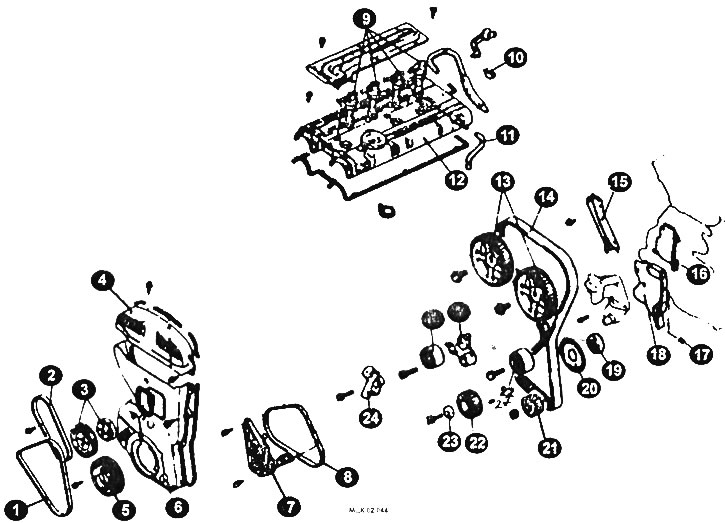
Timing Belt Mounting Elements
1 - V-belt and alternator belt; 2 - Power steering pump belt; 3 - water pump gear; 4 - Upper toothed belt cover; 3 - crankshaft pulley; 6 - lower cover of the toothed belt; 7 - tensioner brackets; 8 - air conditioning compressor belt; 9 - spark plug tip; 10 - semicircular plug; 11 - crankcase ventilation hose; 12 - cylinder head cover; 13 - camshaft gears; 14 - toothed belt; 15, 16, 18 - rear cover of the toothed belt; 17 - hatch plug: 19 - bypass roller; 20 - flange; 21 - crankshaft gear; 22 - oil pump gear; 23 - bushing; 24 - automatic tensioner.
Removal
Disconnect the ground cable from the battery.
Remove the left engine splash shield.
With a jack and a wide board positioned under the oil pan, raise the jack enough to support the engine without lifting it.
Remove the engine support bracket.
Remove the alternator belt and power steering belt.
After removing the tensioner, remove the belt.
Remove the water pump pulley together with the power steering pump pulley.
Remove the crankshaft pulley.
Remove the upper and lower timing belt covers.
Remove the upper center cover, crankcase ventilation hose and breather hose from the cylinder block cover.
Label and disconnect the spark plug wires from the spark plugs.
Remove the cylinder block cover and its gasket.
Remove the semi-circular plug from the cylinder head.
Turn the crankshaft clockwise until all the timing marks are aligned. In this case, the piston of the first cylinder of the engine will be at TDC of the compression stroke.
CAUTION: Do not move the camshafts or crankshaft in this position, as this may cause very serious damage.
Remove the automatic timing belt tensioner.
Remove the timing belt.
Remove the tensioner pulley.
Carefully inspect the timing belt for cracks or wear. The belt should be in excellent condition. If there are any defects, the belt should be replaced. It is recommended to replace the belt every time it is removed from the engine, especially on high-mileage engines.
Visually inspect the condition of the timing belt. If any of the following defects are found, replace the belt.
The teeth are broken or cracked at the base
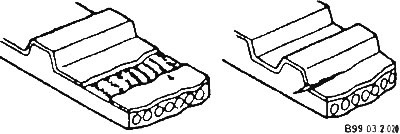
Possible causes of defects:
- camshaft and distributor jamming;
- the crankshaft and/or camshaft seals are damaged.
The back side of the belt is badly worn or has cracks
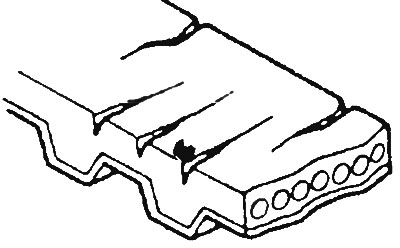
Possible causes of defects:
- tension roller jamming;
- engine overheating;
- the belt is catching on the cover.
The side surface of the belt is worn. The edges of the belt are rounded, the cord threads are frayed and protrude outward
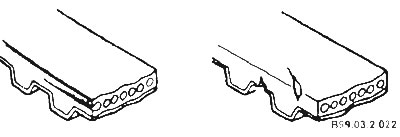
Possible causes of defects:
- incorrect belt installation;
- the side surfaces of the tension roller are nicked or heavily worn.
Wear of teeth. The outer coating on the thrust surface of the teeth is worn off, the rubber layer underneath is worn and has a whitish color
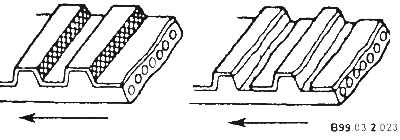
Possible causes of defects:
- poor belt cover seal;
- coolant pump leak;
- camshaft malfunction;
- distributor malfunction;
- excessive belt tension.
Oil, coolant or water getting on the belt
Possible causes of defects:
- poor sealing in the oil seals;
- coolant pump leak;
- poor sealing of the belt cover.
Check the wear of the gear wheels and tensioner rollers. The gear teeth should have a clear profile, should not be rounded, and the gullies between the teeth should be clean. The tensioner roller and idler roller should rotate freely without binding or unusual noise.
Replace the tensioner if it shows any signs of oil leakage.
Check the automatic tensioner for wear and damage. Carefully inspect the push rod tip for signs of wear. Measure the push rod protrusion length. The required value is 12 mm (dimension L). If this parameter does not match, replace the automatic tensioner.
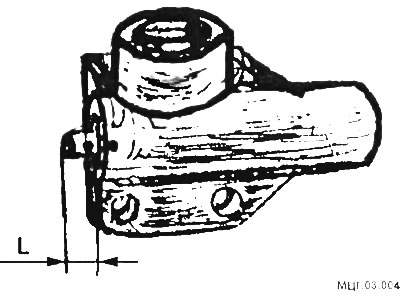
Install the automatic tensioner in a vice with protective jaws. The unit must be in a horizontal position. Tighten the vice and squeeze the tension tip. If the rod is retracted freely, the unit has lost its tension properties and must be replaced. When retracting the rod, you should feel a lot of resistance.
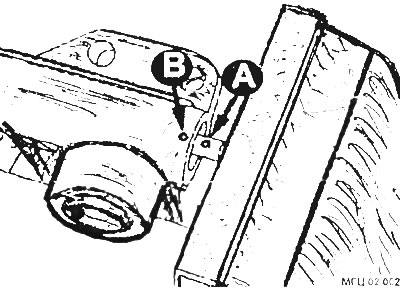
After retracting the plunger into the automatic tensioner housing, align the hole in the push rod (A) with the hole in the housing (B). Once the holes are aligned, pin the push rod in place with a piece of stiff 1.5 mm diameter wire. The tensioner is easier to install with the push rod retracted. Leave the wire in place and remove the assembly from the vice.
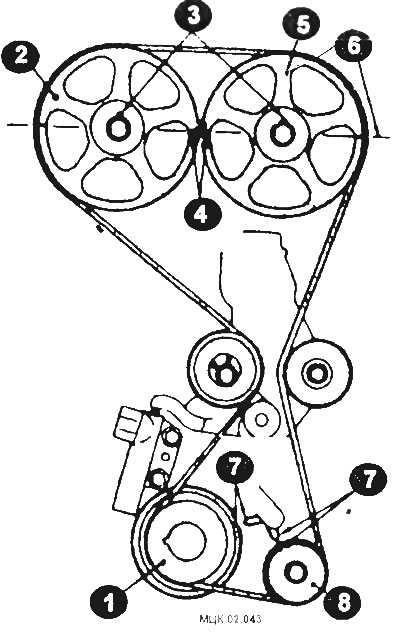
Correct position of the timing belt
1 - gear wheel; 2 - toothed track of the exhaust camshaft; 3 - key; 4 - installation marks; 5 - intake camshaft gear; 6 - installation marks; 7 - installation marks; 8 - crankshaft gear.
Installation
The toothed belt is installed in the reverse order, taking into account the following:
Install the tensioner housing onto the engine.
Install the camshaft timing belt. It is necessary to start from the crankshaft, then through the gear wheel of the oil pump to the gears of the camshafts (through the bypass roller and tensioner).
CAUTION: Do not disturb the position of the timing marks. If the old belt is installed, its direction of rotation must not change.
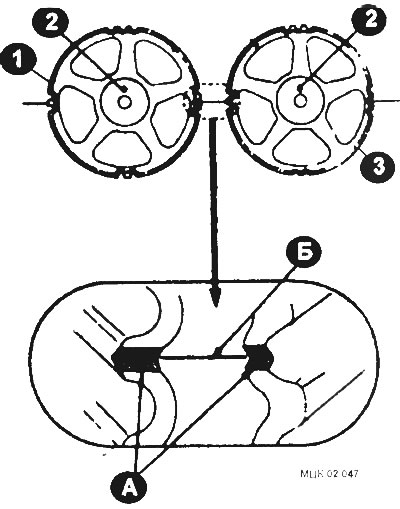
Location of timing marks on camshaft gears
1 - exhaust valve gear; 2 - toothed wheel locating pin; 3 - inlet valve gear; A - marks of camshaft gears; B - mark located on the cylinder head.
Loosen the tensioner bolt (3) and move the tension roller until the belt is evenly tensioned and the bolt is tightened. The holes in the roller (1) should be located to the left of the central bolt (2).
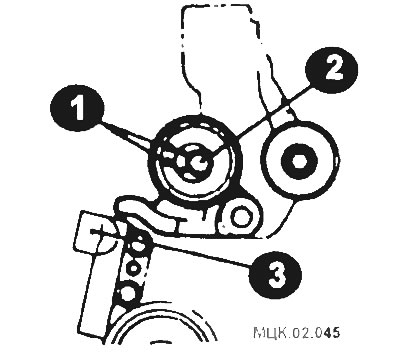
Check that the timing marks on the belt are aligned.
Turn the crankshaft 1/4 turn counterclockwise.
Turn the crankshaft until the timing marks on the timing belt align.
After loosening the tensioner bolt, install the special device into the roller hole.
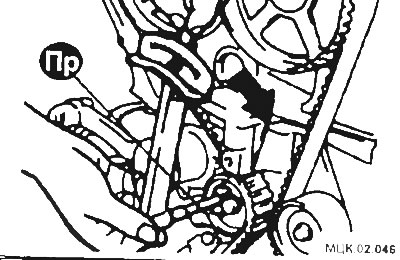
Turn the tension roller to a torque of 3 Nm.
Tighten the central bolt to 50 Nm.
Turn the engine crankshaft two full revolutions and wait for 5 minutes.
Remove the wire from the tensioner and release the pusher.
Check the tappet protrusion. The required value is 3.5-4.5 mm. Otherwise, do the following operations.
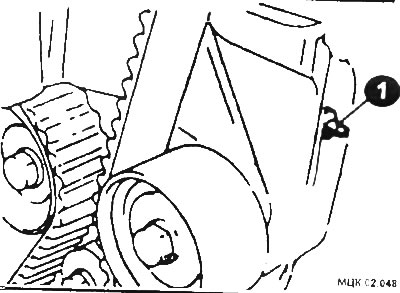
Screw the special threaded tool into the engine hole.
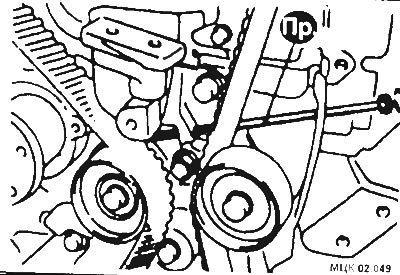
Adjust the required amount of push rod (1) protrusion (gap between tensioner (3) and tensioner lever (2)).
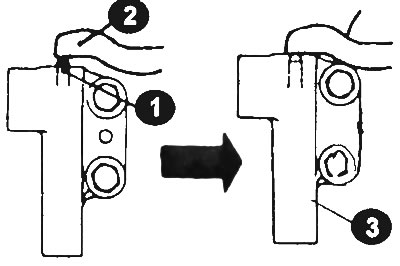
After checking the alignment of the timing marks on the timing belt, install the front engine covers. Remember that the cover mounting bolts differ in length.
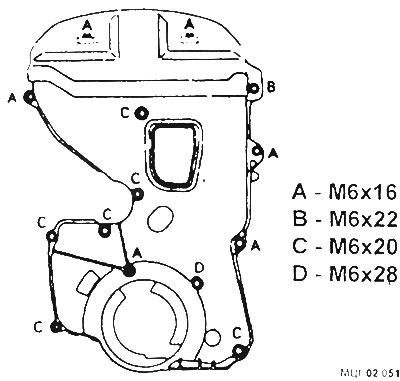
Location of front engine cover mounting bolts
Further installation of the removed elements is carried out in the reverse order.